

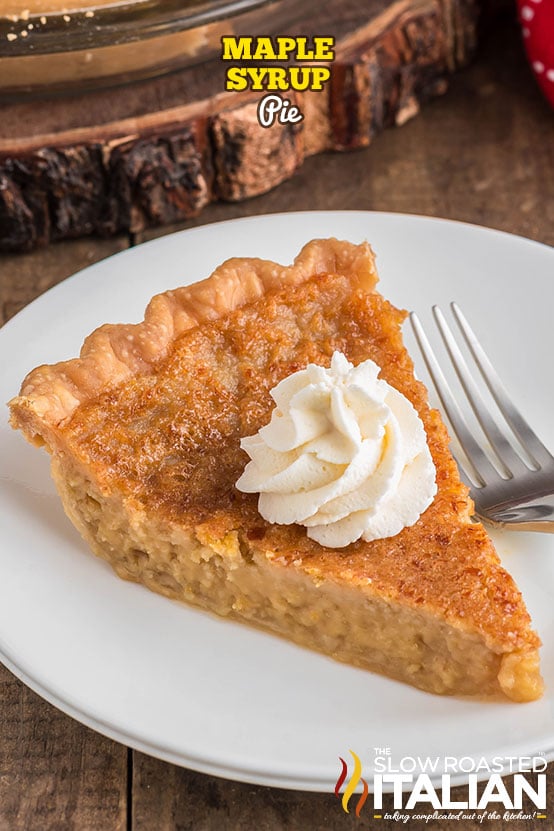
Easy Maple Pie Recipe with Grade A Syrup (Vermont Inspired)
Maple Pie is naturally sweetened with Grade A maple syrup, vanilla extract, and a healthy helping of brown sugar! Indulgent and full of molasses-like flavor, it’s a unique dessert option that’s sure to please. Serve with maple whipped cream and some ice cream for a decadent dessert option at your next party! New recipes like this are fun and delicious!
Pie baking is one of my favorite things to do! You can make this maple cream pie during the holiday season or any time the craving hits.
Since it doesn’t take a lot of time to make, I keep the printable recipe card handy for when I get a request from the family.
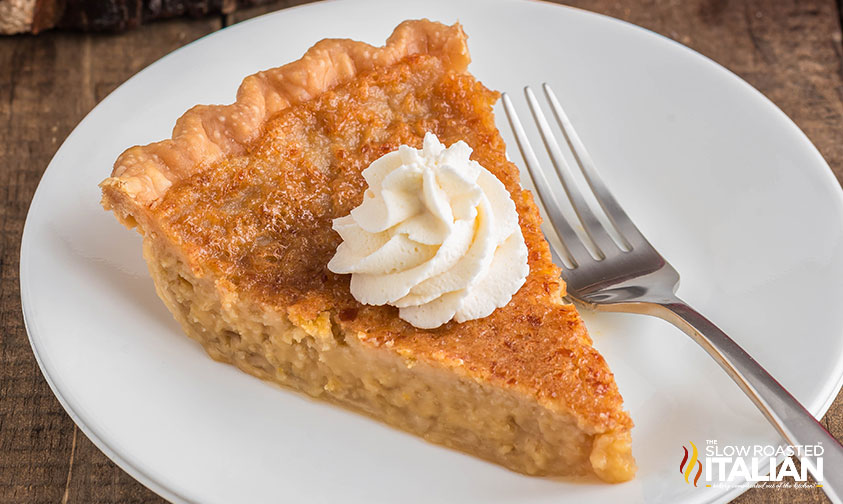
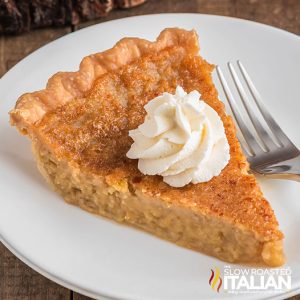
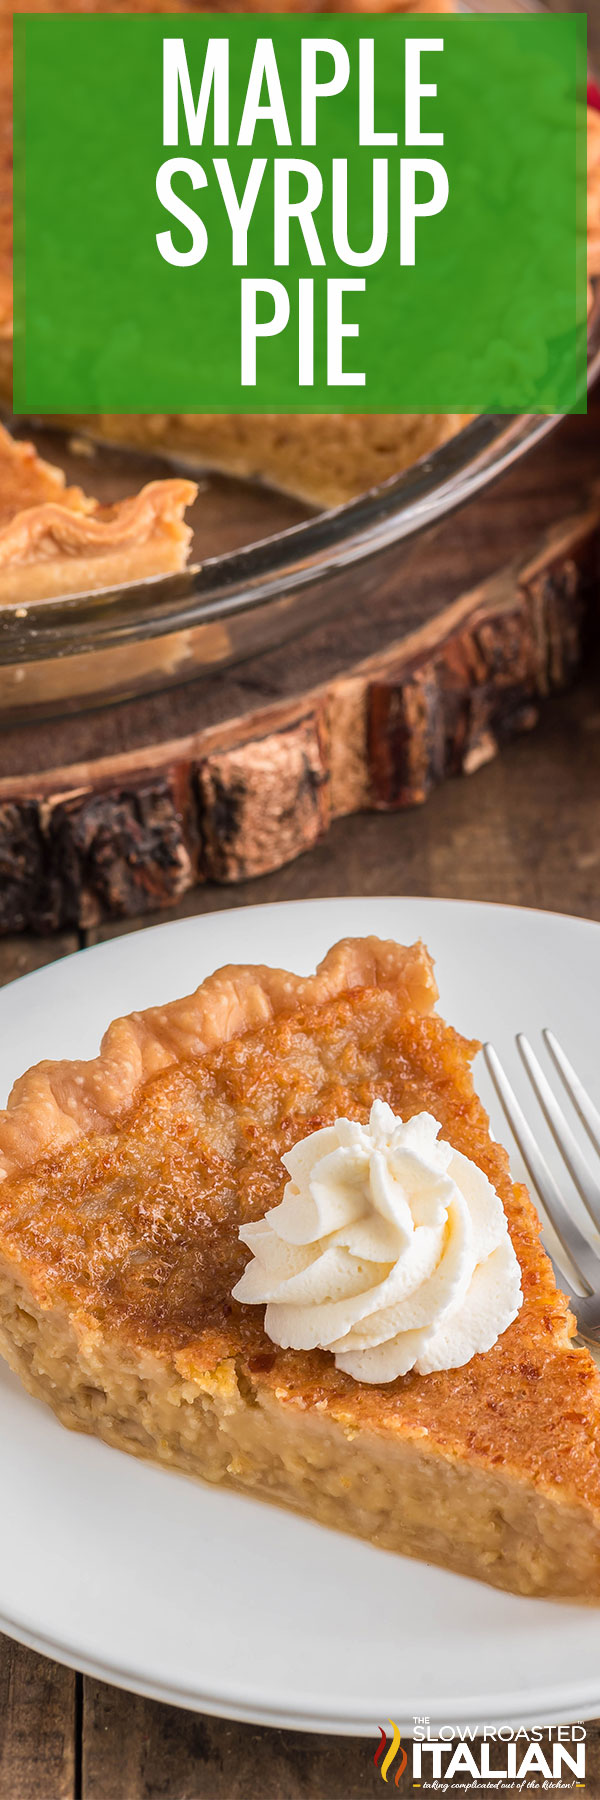
I love topping this maple custard pie with homemade whipped cream! You can add a little bit or cover the entire top – totally up to you!
The good news is that you won’t have a hard time making this maple sugar pie – it’s easy, fast, and delicious. Make this pie today!
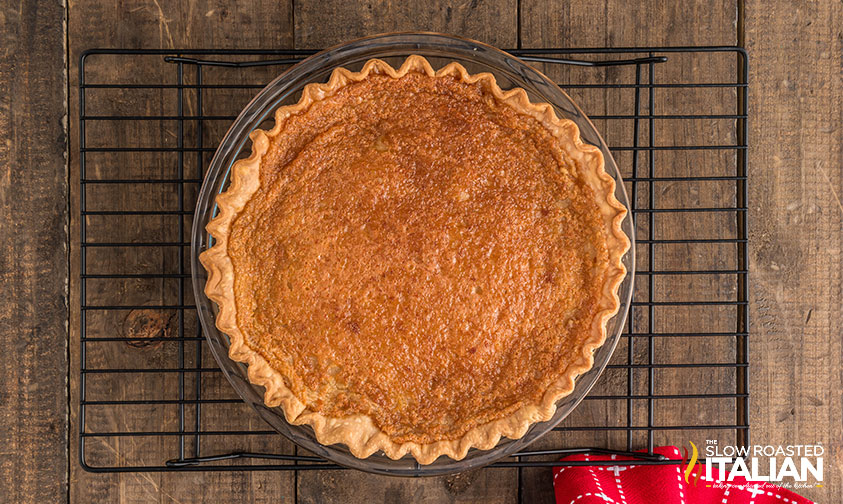
Maple Pie
I love maple syrup and I love pie, so naturally I had to try my hand at maple syrup pie!
After some experimentation, I came up with what I believe is the best maple pie recipe you’ll ever taste!!
As you may have guessed, maple pie is really popular in Canada and the Northeast.
It makes sense… most of the maple syrup that we have comes from that area of the world.
I imagine someone had a bunch of maple syrup they needed to use up, and this pie recipe was born. Whoever came up with it, I’m glad they did!
While everyone else is out there serving up peach cobbler and blueberry desserts (which are both amazing in their own right, don’t get me wrong!), bring this maple pie recipe to your next potluck, cookout, or holiday party.
Everyone will be so impressed with how unique — and tasty — it is!
Plus, my version is full of tons of shortcuts. Use a store-bought pie crust, and no blind baking is involved. Score!!
Ingredient Notes and Substitutions
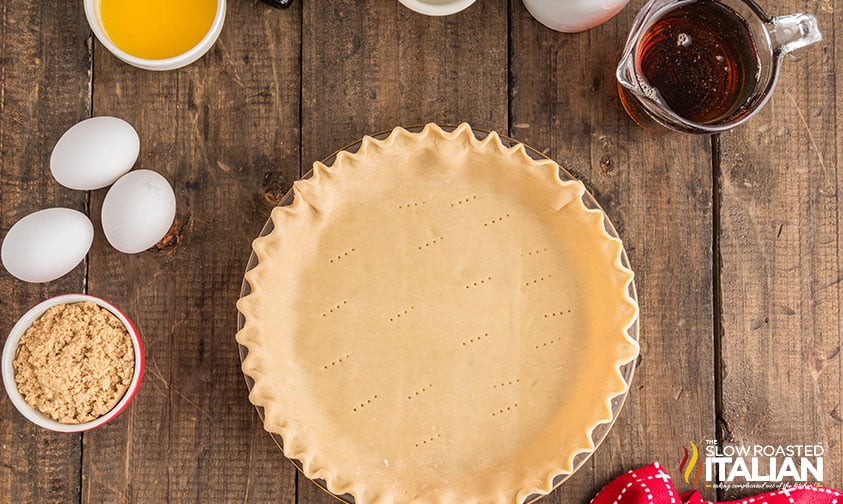
- Pie Dough – Make things easier for yourself and opt for a store-bought pie crust — don’t worry, I won’t tell!
Choose a pie dough that’s big enough for a 9-inch pie. Since this pie only has a bottom crust, keep it simple and use a premade or frozen crust. - Real Maple Syrup – The most important ingredient in your maple syrup pie recipe! I recommend you use Grade A syrup for its pure, sweet flavor.
If you prefer a deeper maple taste, use Grade B. As a note, Grade A isn’t better quality than Grade B, they’re simply different in color and flavor.
You can use dark maple syrup as well. Don’t skimp on the quality is this is super important for the maple syrup mixture. - Heavy Cream – Also needed for the maple filling, heavy cream will give you the best texture. You could also use half-and-half as a substitute.
- Brown Sugar – I’m using light brown sugar — if you don’t have any dark brown sugar works too. It will also give you a deeper, more molasses-like flavor!
- Unsalted Butter – You’ll have a lot more control over the alt level if you use unsalted butter for your maple pie.
That said, if you do want to use salted, simply reduce the extra salt the recipe calls for by about half. - Vanilla Extract – For more deep, warm, and earthy flavor. Vanilla complements the maple syrup and brown sugar wonderfully!

Tips and Tricks to Make Perfect Maple Syrup Pie
- No blind baking needed!
Some pie recipes require you to pre-bake the pie dough, or “blind bake” it. You won’t need to worry about that with my easy maple syrup pie recipe.
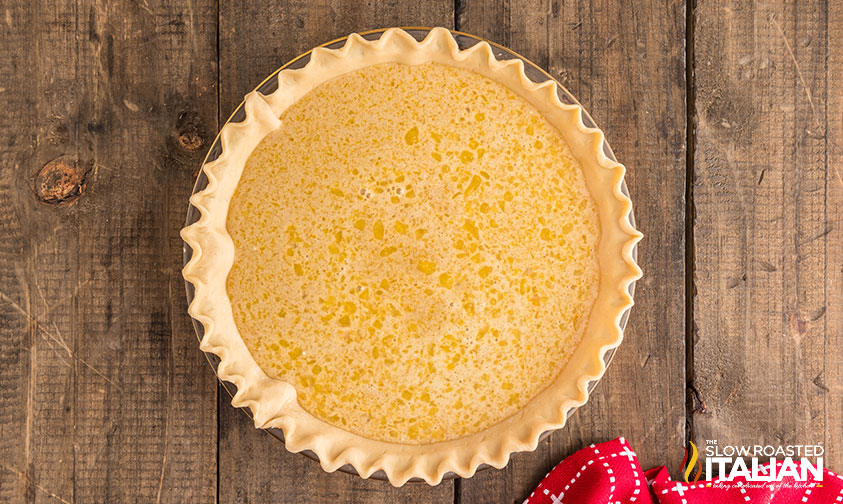
Simply add the filling to the uncooked crust and then bake.
They both bake together perfectly!
- Bake low and slow.
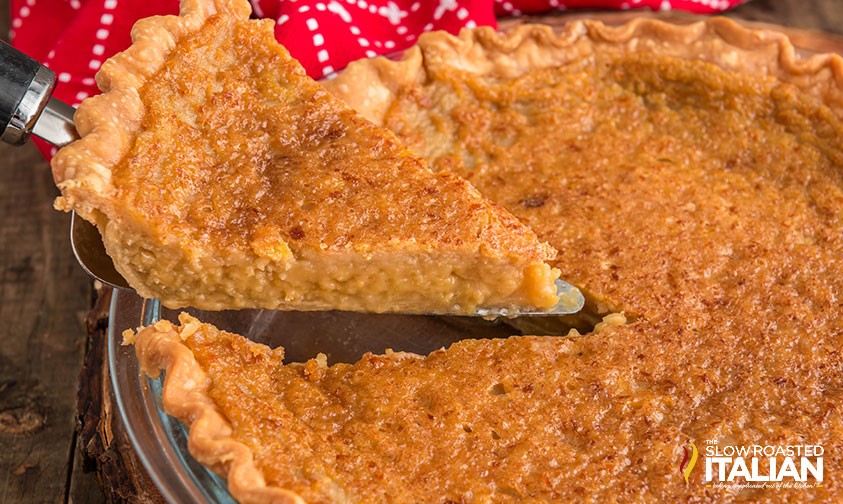
I bake this pie recipe at 350°F for close to 50 minutes. I find that the filling and crust bake best at a lower temperature for a longer amount of time.
You’ll get a perfectly smooth and creamy texture without overcooking or curdling the eggs — plus the filling will set gradually and evenly, resulting in a truly luscious taste and feel!
Remember to keep an eye on the pie (ha!) after around 30 minutes. You can place some foil over the crust to prevent burning if needed.
- Use the jiggle test to check for doneness.
You’ll be able to tell your pie is done baking when the edges are set but the center jiggles slightly when gently shaken. Use oven mitts to shake it to double-check!
It will continue to set when it cools, so a little jiggle is perfectly fine.
Prep Ahead
- Preheat the oven to 350°F
- Melt and cool the butter
- Roll out the pie crust
- Place the crust in a 9-inch pie dish
Kitchen Tools You Will Need
- Pie Dish – This is my everyday pie dish, but it’s pretty enough to use for guests too.
- Measuring Cups and Spoons – You may be tempted to eyeball the amounts, but I recommend using the proper tools so it comes out just right.
- Mixing Bowls – I like to have a variety of sizes on hand, and this set has them all. From a large bowl to a small bowl, and a medium bowl, too.
- Whisk – These have held up for over 10 years and are still as good as the day I bought them. With 3 sizes, there is a whisk for every job!
Serving Suggestions
I always top a slice with Maple Whipped Cream or vanilla ice cream… or both when I’m feeling indulgent!
To keep things lighter, some fresh fruit like strawberries or apples contrasts the sweetness of the pie really nicely.
Chopped nuts like pecans or walnuts would also pair well!
If you’re craving a maple-themed dessert spread, why not serve my No-Churn Maple Bacon Ice Cream or Cranberry Maple Donut Bread Pudding too?
Wash it all down with a Maple Latte for a full-fledged maple syrup extravaganza!
As a note, you can enjoy my maple pie hot or cold! It’s delicious either way, so it’s really all about personal preference.
Storing, Freezing, and Reheating
Store leftover pie in an airtight container or tightly wrapped in plastic in the refrigerator for up to 3 or 4 days.
To reheat, use your microwave or place in the oven at 350°F for about 10-15 minutes until warmed through.
Maple syrup pie can also be made ahead of time — store it in the fridge, covered, for up to 3 days. Let it come to room temperature or warm it before serving.
If you made a double batch or don’t want larger portions to go to waste, you can also freeze this dessert!
Wrap it tightly in several layers of plastic wrap and foil and freeze for up to 1-2 months. Let it thaw in the fridge overnight before serving or reheating.
Maple Pie Recipe FAQ
No, I don’t recommend it! Pancake syrup often contains artificial flavorings, corn syrup, and other nasties which could mess with the texture and taste of the maple pie.
For the best results, always opt for Grade A or B maple syrup to get that authentic maple flavor!
There are a few possible reasons! The most common is that you likely undercooked the pie, preventing the filling from setting properly. Make sure to leave it in the oven until the center is just set and jiggles when gently shaken.
Another culprit is using too many liquid ingredients and not enough thickening agents. Make sure to follow the quantities on the recipe card closely!
Check on your pie after around 30 minutes of baking. If it looks like the crust is a nice, golden-brown color already, add some foil to protect it from burning.
You may also want to bake the pie on the lower rack in your oven to help shield it from the direct heat.
It shouldn’t – but sometimes things happen. You may have simply overfilled the pie shell! If you’re worried, you can also put the pie plate on top of a baking sheet before placing it in the oven. That way, as the pie is baking to that perfect golden brown color, the baking sheet underneath the pie dish will catch anything that spills over.
Enjoy!
With love, from our simple kitchen to yours.
Don’t miss a thing! Follow us on
Facebook| X | Pinterest| Instagram


Easy Maple Pie Recipe with Grade A Syrup (Vermont Inspired)
Ingredients
- 1 pre-bought pie dough, for a 9-inch pie
For the filling:
- 1 cup maple syrup, Grade A
- 3/4 cup heavy cream
- 1/2 cup light brown sugar, packed
- 3 large eggs, at room temperature
- 2 tablespoons unsalted butter, melted and cooled
- 1 teaspoon vanilla extract
- 1/4 teaspoon salt
Topping (optional):
- Maple whipped cream or vanilla ice cream
Instructions
- Preheat the oven to 350°F (175°C). Unroll the pre-bought dough and press it into a 9-inch pie dish. Trim any excess dough from the edges. Crimp the edges of the dough around the edge of the pie plate. Set aside.
- In a large bowl, whisk together the maple syrup, heavy cream, light brown sugar, eggs, melted butter, vanilla extract, and salt until the mixture is smooth and combined.
- Pour the filling into the prepared pie crust. Bake in the preheated oven for 45-50 minutes or until filling is set, checking the crust at the 30 minute mark and covering the edges with foil to prevent burning.
- Remove the pie from the oven and allow it to cool on a wire rack for at least 2 hours. The filling will continue to set as it cools.
- Once cooled, slice the pie and serve. The pie can be served as is, or top with a dollop of whipped cream or a scoop of vanilla ice cream. Enjoy!
Donna’s Notes
Nutrition
All nutritional information is based on third party calculations and is only an estimate. Each recipe’s nutritional value will vary depending on the ingredients used, measuring methods, and portion sizes.
Originally published May 2024, updated and republished May 2025
Disclosure: Posts may contain affiliate links. If you purchase a product through an affiliate link your price will remain the same and The Slow Roasted Italian will automatically receive a small commission. Thank you for supporting us, it helps us keep creating new recipes.


Welcome!
We’re Donna and Chad, the dream team behind The Slow Roasted Italian. Our focus is on taking complicated OUT of the kitchen. Life is busy enough, making meals should be fast and easy, to help make your life as simple as possible. Read More >>


This maple pie was absolutely delicious and so simple to make! Definitely a keeper.
Hi Sarah!
We’re so glad that you enjoyed the recipe!!
TSRI Team Member,
Devlyn