

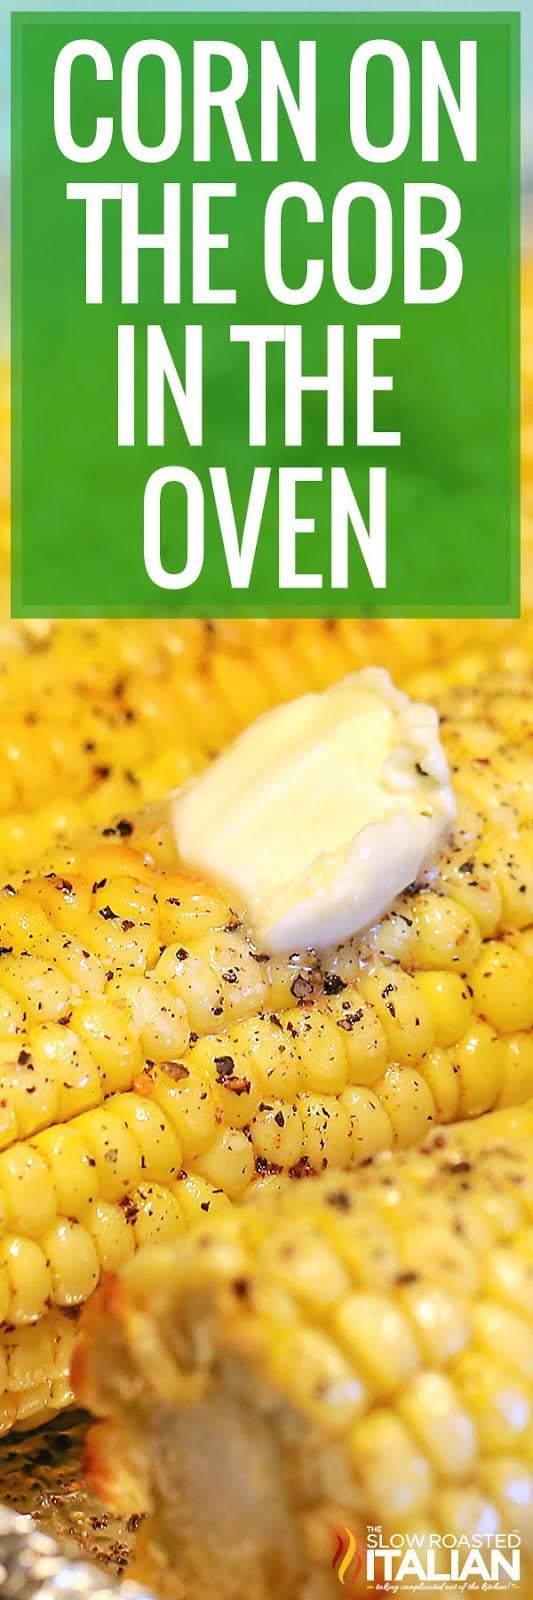
How to Make Corn on the Cob in the Oven + Video
This post may contain affiliate links. Please read my disclosure policy.

This recipe for Corn on the Cob in the Oven is prepped and ready to bake in just 10 minutes! It’s the easiest way to enjoy a simple veggie side or use the kernels in another recipe. Whether I’m at a picnic, barbecue, or summer potluck, it always disappears first.
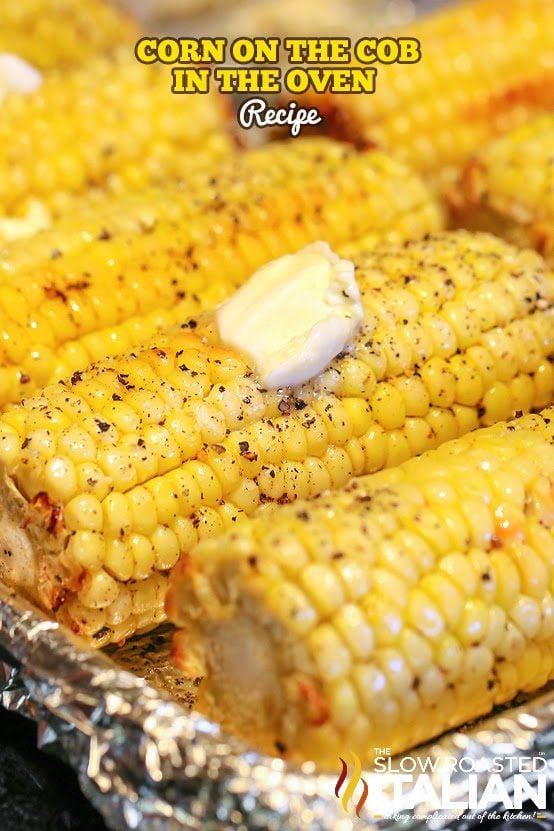
Pops of sweetness in every bite, slathered with melted butter and a variety of seasonings… my mouth is watering just thinking about it.
Learn how to cook corn on the cob in the oven in a few easy steps, plus all the different ways to add extra flavor!
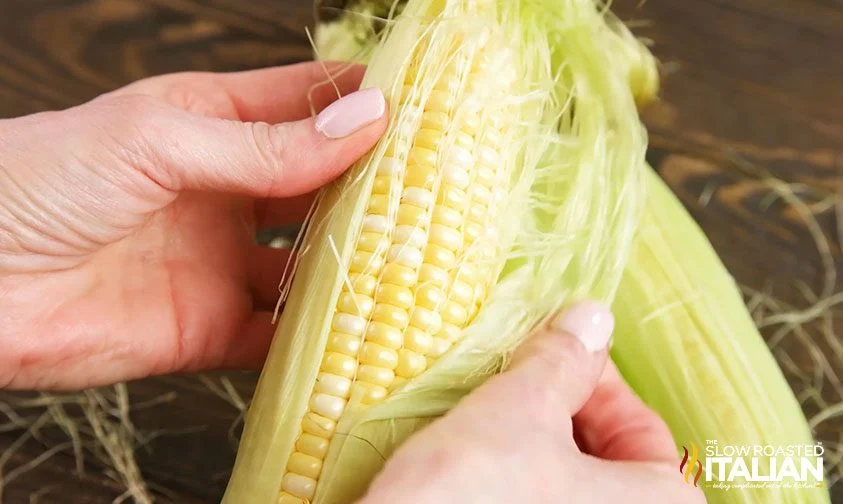
Table of Contents
Corn on the Cob in the Oven
Corn on the cob is a whole personality in the Midwest. Like… Legit.
A person in a corn costume is a mascot for a sports team. Corn is a huuuuge deal in Iowa. And this recipe brings that same fairground energy straight to your kitchen.
No grill? No problem. You’re still getting juicy, golden, roasted goodness in every buttery bite.
I roast corn on the cob in my oven when the weather’s acting up, or I just don’t feel like messing with propane and grill tongs.
That caramelization? Chef’s kiss. The butter? Everywhere. It’s sweet corn season magic.
And yes, I promise you’ll catch me stealing the first ear before it even hits the table. #NoApologies
Recipe Video
See us roast corn on the cob in the oven from start to finish by watching the video in this post!
While corn on the cob couldn’t be simpler to prep, there are plenty of different ways to cook it.
You should try my perfect stove top version too. Between that and corn on the cob in the oven, you’ll be making it all year long!
Or, maybe you want to use the crockpot, Instant Pot, or an air fryer. These cooking methods allow you to enjoy the same flavor as oven roasted corn on the cob without heating up your whole kitchen.
That’s a win-win!
Looking for something more decadent? Try my Candied Bacon-Wrapped Roasted Corn! Sweet kernels and smoky strips of bacon are sprinkled with brown sugar for a sticky, sweet coating.
INGREDIENT NOTES
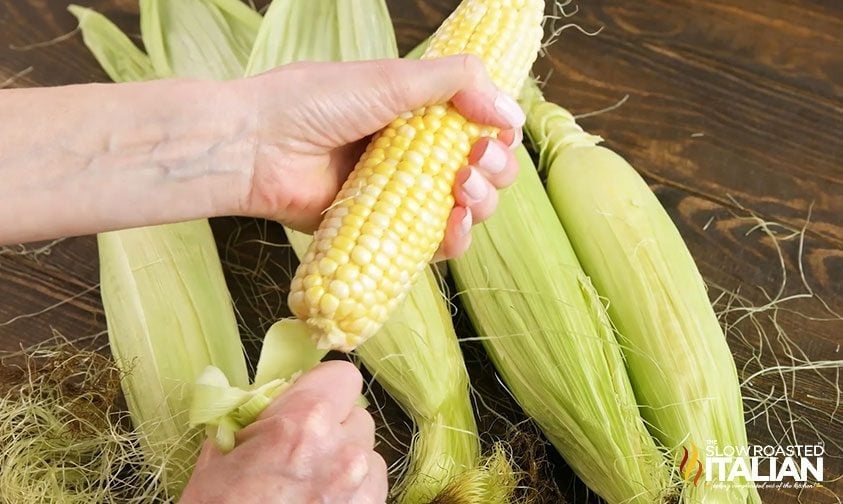
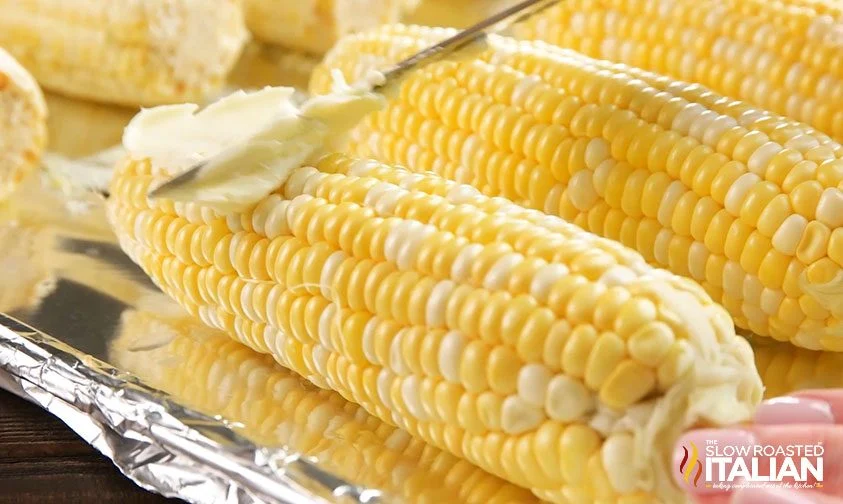
- Corn on the Cob: Look for ears with bright green husks and firm (not shriveled) kernels. Peel back the husks about a quarter of the way to check.
When summer’s over, make this same recipe with frozen corn on the cob! Thaw it completely in the fridge, then bake until browned. - Unsalted Butter: Room temperature butter spreads a lot easier. Swap with seasoned or compound butter for more flavor.
Need a butter substitute? Olive, vegetable, or even coconut oil can be used instead. You just need some kind of coating so the kernels don’t dry out. - Salt & Pepper: Start with a little bit and add more to taste.
VARIATIONS
Spicy Butter Corn: Mix cayenne or chipotle powder into the butter before spreading.
Citrus Hint: Try a compound butter with lemon or lime zest.
Garlic Herb Corn: Combine butter with minced garlic and chopped parsley or chives.
Mexican Street Style: Slather baked corn on the cob with mayo, sprinkle on cotija cheese and chili powder, and finish with fresh lime juice.
Parmesan Roasted Corn: Top with grated Parmesan and Italian seasoning during the last 5 minutes of baking.
Sweet & Salty: Brush with honey butter and a pinch of sea salt before serving.
BAKED CORN ON THE COB FAQ
You can shuck and clean the ears 2 to 3 days in advance and store them tightly wrapped in the refrigerator. Trim them just before baking so they don’t dry out.
Not at all! Oven roasted corn on the cob comes out perfectly cooked, no boiling necessary.
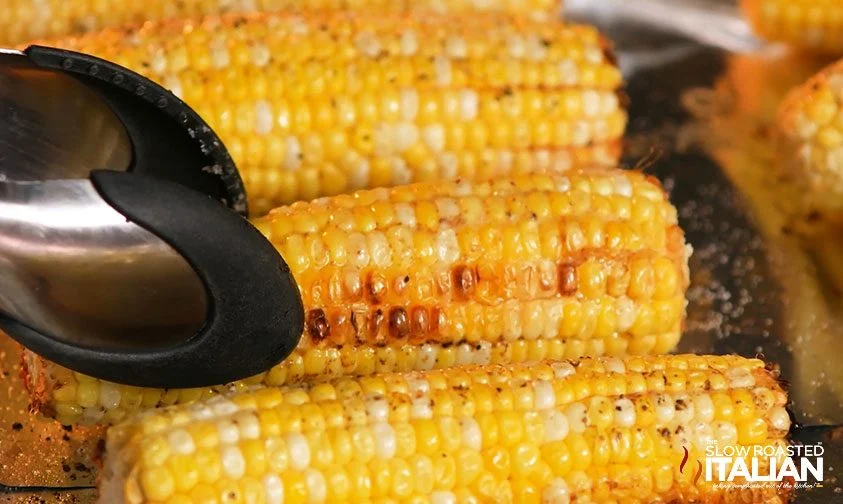
Nope! Baking corn on the cob in an oven uncovered allows it to caramelize and gives the kernels a better flavor.
The corn will be tender, lightly brown in spots, and the kernels will look plump and juicy.
Wrap in foil with a little butter inside, then place corn on the cob in the oven for about 10 minutes at 350°F. If frozen, let it thaw in the refrigerator first.
Over the years, I’ve found that oven-roasting corn is a total game-changer, especially when I don’t want to deal with the grill.
The key is high heat and turning the corn to get those caramelized edges.
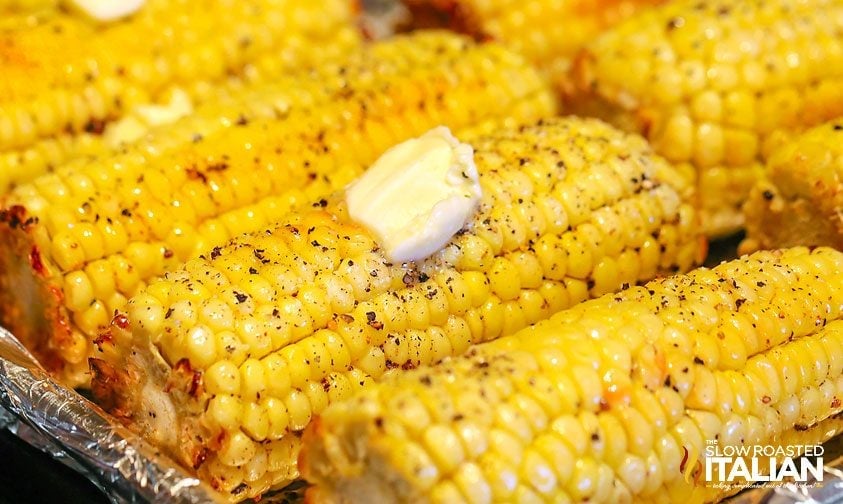
Spread the butter in stages. Half before baking, half after makes sure you get buttery flavor baked in and fresh on top.
And if you’ve never tried a flavored butter blend with baked corn on the cob? Now’s the time!
DONNA’S PRO TIPS
- Turn the corn a few times during baking to get even browning.
- Line your baking sheet with foil for quick cleanup. Roasted butter gets messy!
- Don’t skip the second buttering. It adds flavor and helps any final seasoning stick.
- Want extra browning? Broil for 2–3 minutes at the end, watching closely.
- Use tongs when turning. The corn gets hot, and the butter makes it slippery!
- Make it a meal: Pair with grilled chicken, burgers, or BBQ ribs for a summer-perfect plate.
TOOLS NEEDED
- Large baking sheet
- Aluminum foil
- Small bowl (if using compound butter)
- Spatula or butter knife
- Tongs
Enjoy!
With love, from our simple kitchen to yours.
Don’t miss a thing! Follow us on
Facebook| Twitter| Pinterest| Instagram

How to Make Corn on the Cob in the Oven + Video
Ingredients
- 8 ears corn on the cob, husks and silk removed
- 8 tablespoons unsalted butter, room temperature
- 1 teaspoon kosher salt, or more to taste
- 1 teaspoon fresh ground black pepper, or more to taste
Instructions
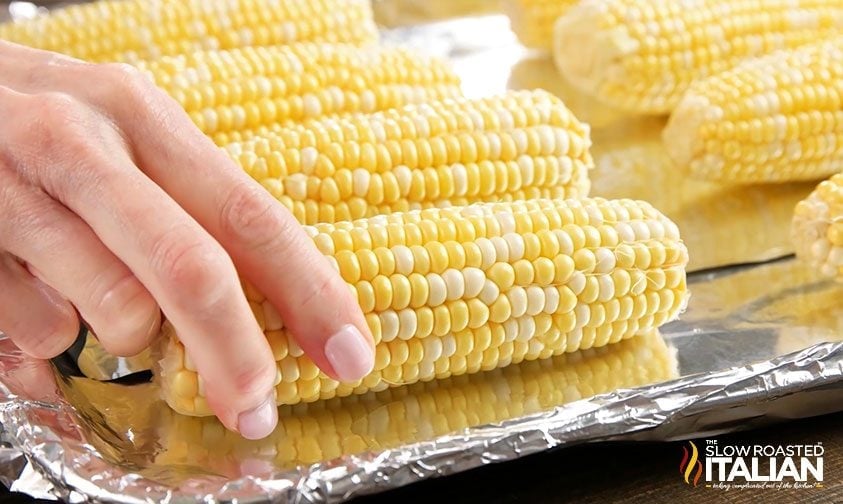
- Preheat the Oven: Preheat oven to 400°F. Line a baking sheet with aluminum foil for easy cleanup.
- Season the Corn: Place 8 ears corn on the cob on the prepared baking sheet. Spread about half of the 8 tablespoons unsalted butter evenly over the corn. Sprinkle it with 1 teaspoon kosher salt and 1 teaspoon fresh ground black pepper to taste.
- Bake the Corn: Bake for 30 to 45 minutes, turning the corn occasionally, until the kernels are tender and beginning to brown in spots.
- Finish with Butter: Remove from the oven. Spread the remaining butter over the warm corn and sprinkle with additional salt and pepper, if desired.
- Serve: Serve hot and enjoy!
Video
Donna’s Notes
Nutrition
All nutritional information is based on third party calculations and is only an estimate. Each recipe’s nutritional value will vary depending on the ingredients used, measuring methods, and portion sizes.
Originally published April 2014, updated and republished August 2025
Disclosure: Posts may contain affiliate links. If you purchase a product through an affiliate link your price will remain the same and The Slow Roasted Italian will automatically receive a small commission. Thank you for supporting us, it helps us keep creating new recipes.


Welcome!
We’re Donna and Chad, the dream team behind The Slow Roasted Italian. Our focus is on taking complicated OUT of the kitchen. Life is busy enough, making meals should be fast and easy, to help make your life as simple as possible. Read More >>


Oh this was so much easier than individually wrapping the ears! It was wonderful. I did 2 pans worth. On the 2nd pan, I lightly sprinkled chili powder, lime juice and parmesan cheese. *groan* I could live on this.
This was delicious!
This was delicious! Thank you!
I skip the salt and pepper and use old bay. There is nothing better than old bay on sweet corn. On the east coast the best corn is silver queen, the kernels are translucent and really small but SOO good
This looks delicious. But does the corn turn out soggy or mushy?
No I just cooked it and it was delicious…
Since the grill is already fired up for the steaks, why not use the back burner area to grill the corn instead of heating an oven inside to 400 deg. I smear on a mix of olive oil, butter, Stubbs BBQ rub and sometime a dash of anchovy paste, and others to experiment with. Grill on high heat until brown areas appear, turning every few minutes. Yum!
I'm from New Jersey (best corn ever,,, anywhere),,, don't need to pour butter on or grill…. just 2 min. in boiling water,,,,, sweetest ever! Eat your hearts out!!!
I also like to add cumin or smoked paprika. Yummy.
Just a well meaning word of warning to some of the commenters: Do NOT let foil touch your food when cooking or storing- the aluminum reacts with the acids in foods which
causes carcinogens in your food. If I use foil at all it's overtop plastic wrap and never
when cooking. I know this is a shock, but when you think about it it makes sense, just like aluminum chlorhydrate in anti-perspirant is suspect as a cause of breast cancer.
Sometimes I wrap my fish or veggies in parchment paper and then foil. 🙂
Just tried this tonight because we had some corn in the fridge and it was delicious. Added some chili in lieu of cayenne and it was still fantastic!
You could use any compound butter for this–mix the salt, pepper, and any herbs/spices you like to the butter before you spread it on. I never thought about roasting corn in the oven, but this is a great idea. Thanks!
Tried it. My family Loved it!!!! Never going back to boiling corn again!!!!!!!!!!!!!!!!!!!!!!!!!!!!!!!!!!!!!!!!!!!!!!!!!!!!!!!!!!!!
Cooking with aluminum foil poses no risks. Period.
https://www.realsimple.com/food-recipes/tools-products/aluminum-foil-safe
The first time I tried this I was hooked! It's the only way I do corn now. So delicious, and easy to keep warm. Thank you!
for a couple of years now have been putting corn in the husks on the oven rack at 350 for 30 min. when done the silks slide right off and it's wonderful.
I put the corn in the microwave for about 3 to 4 minutes and then I cut the big end off and squeeze it out of the thin side, the corn just slides right our ( no silk ).
I just steam mine in the steamer for 8 mins without the husks.You can add butter and salt or oil.
Making this right now . I am excited to try it . Looks good .
First time trying corn in the oven and it turned out great! Can't wait to try it when local corn is in season!
This corn is everything!!!!
Can I use corn I froze from last summer?
I bought ur book looking for the fruit salad reciepe where u used honey and I can not find it. Please help
Here you go! Enjoy! https://www.theslowroasteditalian.com/2014/05/orange-honey-rainbow-fruit-salad-recipe.html
I’ve tried this recipe several times and still like it! And right now is the right season to cook this dish.
Hi Anna,
We are so happy you enjoy it! Have a great day!
TSRI Team Member,
Holli
This corn on the cob is a game-changer! So easy to make and absolutely delicious.
Hi Ethan!
So glad you enjoyed!
TSRI Team Member,
Devlyn
Made this today for the 4th of July and it was AMAZING!! I will keep this recipe. TYSM!
Hi Marie!
It’s delicious! Glad to have one of our recipes as a keeper in your home.
TSRI Team Member,
Devlyn