

Tiramisu Ice Cream Cake + Video
This post may contain affiliate links. Please read my disclosure policy.

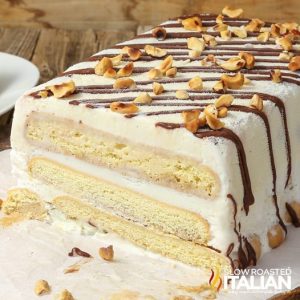
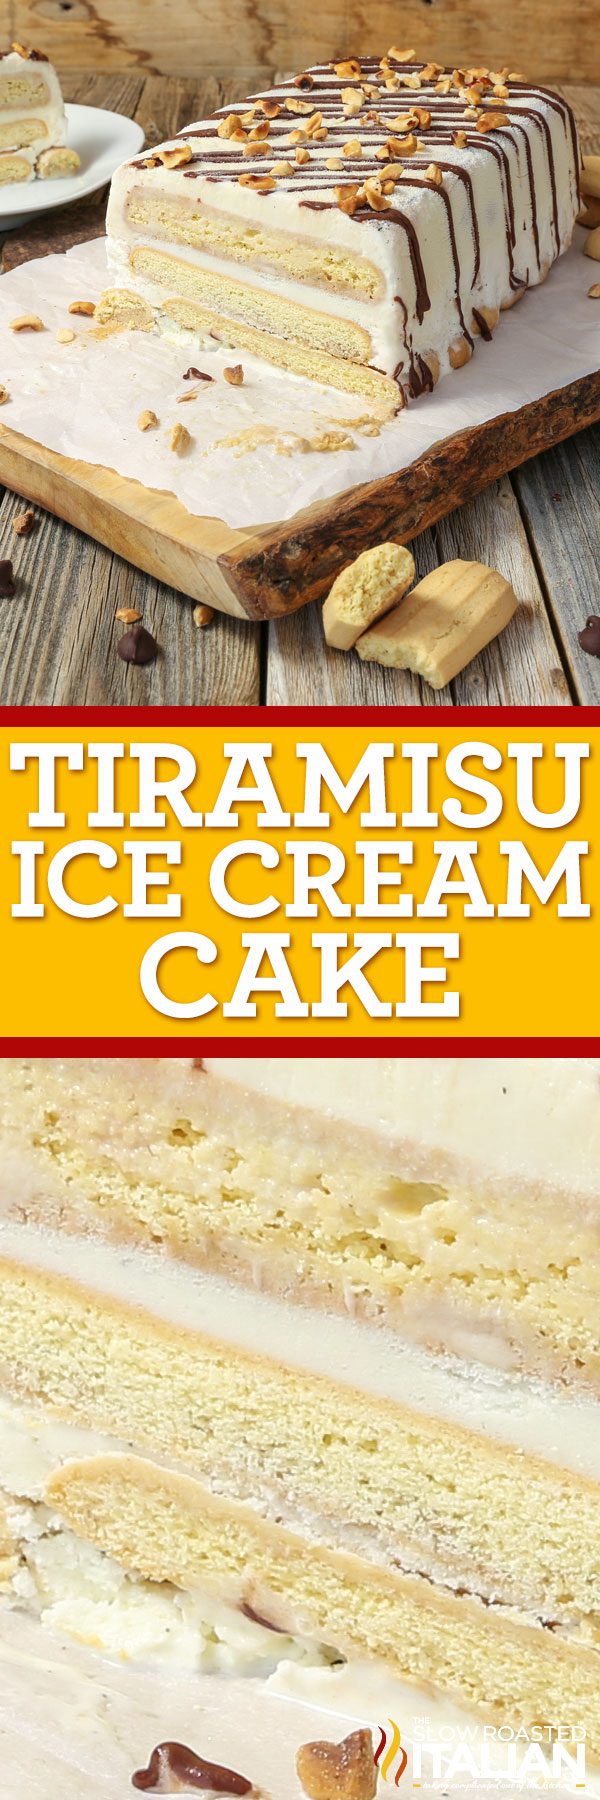
Tiramisu Ice Cream Cake is an unforgettable transformation of the classic Italian dessert into a simple recipe for a glorious ice cream cake unlike anything you have had before. It is rich, creamy, and absolutely special occasion worthy!
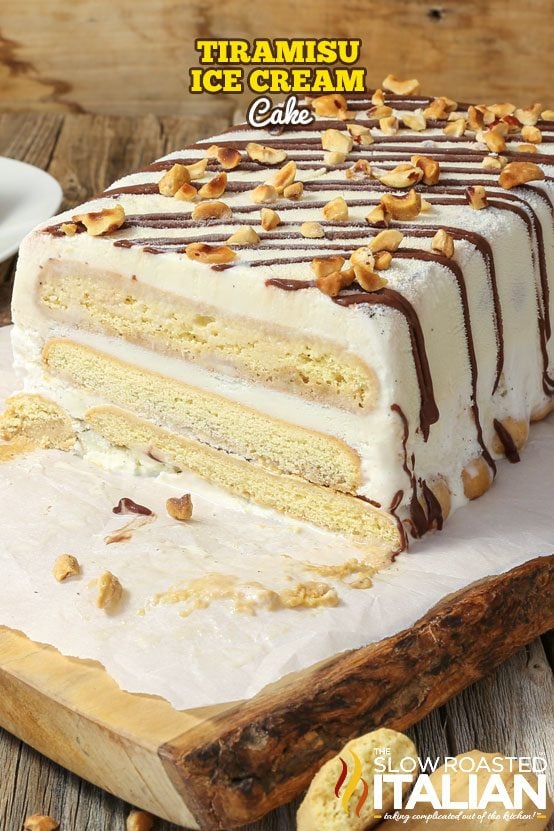
Table of Contents
Tiramisu Ice Cream Cake
When I am brainstorming new recipes, my mind often wanders off to my favorite Italian dessert. Of all the desserts out there, I have to say I absolutely love love love tiramisu!
I am sure you have noticed with all of the tiramisu recipes I have shared with you: cookies, brownies, and even a play on strawberry shortcake.
But none of them compare to the true classic…until now…
I combined my love for tiramisu and ice cream to create one glorious Italian-inspired dessert: Tiramisu Ice Cream Cake.
This recipe is so easy, and the flavor that is imparted to this cake is absolutely divine. We couldn’t stop devouring it!
Recipe Video
To see us make tiramisu cake with ice cream from start to finish, watch the video in this post!
It makes me think of my childhood and the amazing Italian desserts that we enjoyed while the adults sipped on espresso or coffee.
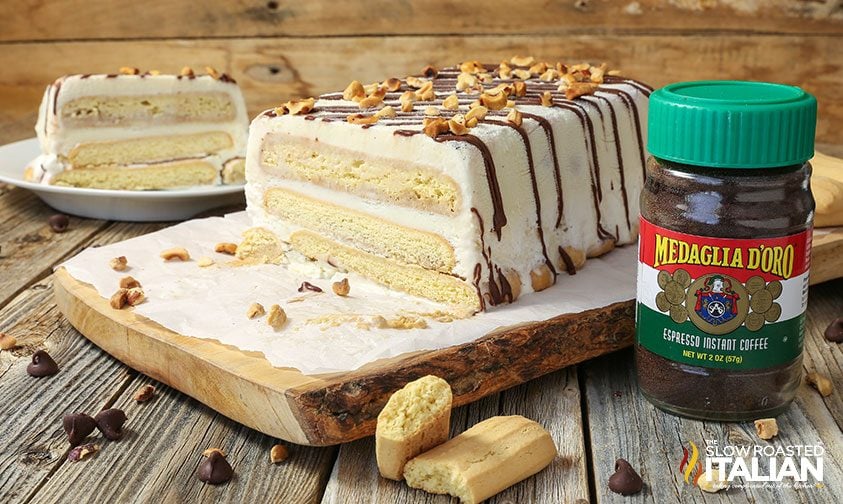
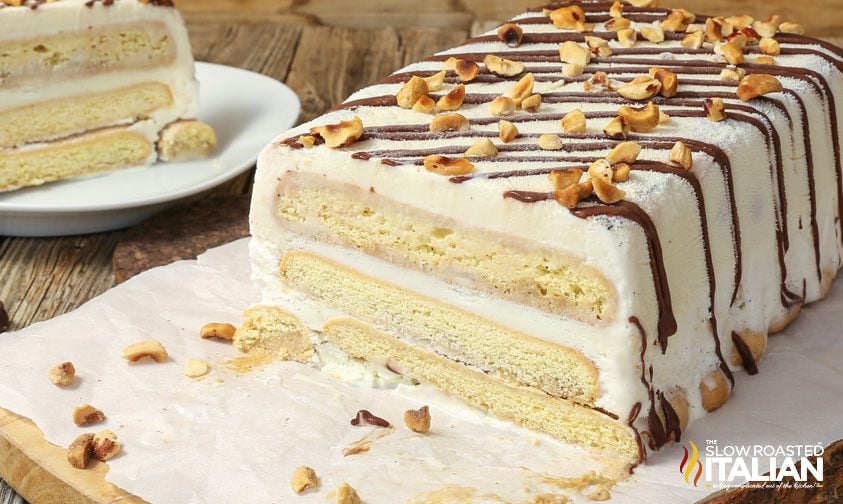
Tender ladyfingers are dipped in an unusually rich, aromatic, and delicious espresso, then layered with rich vanilla ice cream. The flavors kind of remind me of my favorite affogato.
Drizzled with a scrumptious chocolate espresso ganache and sprinkled with hazelnuts to really take it over the top, this ice cream tiramisu cake is one you’ll be making all year long!!
Ingredient Notes and Substitutions
- Vanilla Bean Ice Cream – Use the highest-quality brand you can manage as it will make a big difference in both texture and flavor.
Cheaper ice creams are often not real ice cream, so they tend to be too soft or too icy. Watch out for anything labeled as “frozen dessert.” - Instant Espresso – I love the flavor of Medaglia D’Oro Espresso Instant Coffee — you’ll find it in almost every Italian kitchen!
Combine the powder with hot water to make the espresso, which you’ll use in the ganache and to dip the ladyfingers.
Substitute your favorite brand of instant espresso powder, but don’t swap it for freshly brewed espresso. The flavor won’t be as concentrated, and shots tend to become bitter the longer they sit. - Lady Finger Cookies – These are soft, sponge cake cookies in a long, narrow shape — like delicate fingers!
Brand and quality can make a big difference here, too. Try to find an Italian or English brand, often at higher-end or specialty stores. - Chocolate Ganache – Heat heavy cream and light corn syrup with a little bit of the espresso, then use it to melt semisweet chocolate chips. It makes a rich and shiny topping for the dessert!
Feel free to substitute dark chocolate chips for something less sweet, or use milk chocolate if sweet is your thing. - Hazelnuts – With all the smooth and creamy textures going on in this ice cream tiramisu cake, a little crunch makes a big difference!
I love the flavor of hazelnut with coffee, but sliced almonds are a great alternative.
Tips and Tricks to Make Perfect Ice Cream Tiramisu Cake
- Beat the ice cream in a stand mixer.
This helps it soften quickly and creates a smooth, consistent texture. A handheld mixer will work too, but I like being able to set it and walk away.
You can also simply let the ice cream soften on the counter for 15-20 minutes.
Be sure to stir it really well before you start your layering, or you’ll end up with big chunks of firmer ice cream and lots of melted liquid.
Either way, you want it to be easy to spread into the pan!
- Layer the ice cream and cookies carefully.
Start with the ice cream, then add a row of soaked ladyfingers. It’s important that you dip them into the espresso on both sides so the texture is consistent (and for the best flavor).
Carefully spread more ice cream on top, then add another row. Add the last of the softened ice cream before gently pressing the rest of the cookies just under the surface.
Move quickly since the ice cream will continue to soften and melt as you go. You want it to hold the ladyfingers in place to get those gorgeous layers when you slice into the dessert!
- Heat the cream mixture just until it starts steaming.
You don’t want it to boil or it could spill over the sides of the cup — or worse, start to thicken too much.
It just needs to be hot enough to melt the chocolate chips into a smooth ganache, and the microwave is easier than trying to do it on the stove. Though, you could use the stove if needed.
Once melted, allow the chocolate to cool so it doesn’t melt the ice cream. I’ll usually pop it in the fridge for 10-15 minutes to speed up the process.
Prep Ahead
- Soften ice cream
- Make espresso
- Chop hazelnuts
Kitchen Tools You Will Need
- A Stand Mixer to soften the ice cream quickly.
- 9×5 Bread Pan – The perfect size for ice box or ice cream cakes! Line it with Plastic Wrap to make removing your tiramisu ice cream cake easier.
- Microwave-Safe Bowl or Measuring Cup – To quickly heat the water with espresso powder, then to make the ganache.
- A sturdy Silicone Spatula can be used for scraping, stirring, and smoothing, and is easy to clean too!
Decorating Tips
If you have piping bags already, you can definitely put them to use. Or, I usually just pour the cooled ganache into a quart-sized zip-top bag and snip off the bottom corner. Easy peasy!
Have your chopped nuts ready — you’ll need to sprinkle those on immediately after adding the ganache so they stick properly.
The cold from the tiramisu cake ice cream will cause the chocolate to set faster than usual.
Once your dessert is done, pop it back in the freezer for a few minutes to make sure everything is set, or until you’re ready to serve!
Storing Ice Cream Cake
While ice cream cake is typically good for 1-2 months, homemade versions often last about a week before the texture starts getting a bit funky.
Really, this tiramisu version is best within a few days since the lady finger cookies aren’t as dense as regular cake. They simply won’t hold up as well in the freezer.
Keep the dessert wrapped tightly in plastic wrap and foil, or in an airtight container, and store it in the coldest part of your freezer — typically towards the back.
Tiramisu Cake Ice Cream FAQ
That depends on the recipe! Ladyfingers are often soaked in a mixture of espresso or coffee and a small amount of alcohol.
I like to make mine with dark rum, but other popular choices include amaretto, Marsala wine, or a coffee liqueur.
There’s no alcohol in this tiramisu ice cream cake, but you can add some to the instant espresso if you’d like!
Start with a large knife (like a chef’s knife) and run it under hot water for a few seconds to warm the metal. Dry it thoroughly with a clean towel, then press straight down into the cake.
The blade will glide easily through the layers, and you’ll get perfectly clean edges. Wipe the knife clean between slices if anything sticks to the surface.
Enjoy!
With love, from our simple kitchen to yours.
Don’t miss a thing! Follow us on
Facebook | Twitter | Pinterest | Instagram

Tiramisu Ice Cream Cake + Video
Ingredients
- 6 ounces water
- 1 teaspoon Medaglia D’Oro Espresso Instant Coffee
- lady finger cookies, about 24-28 cookies
- 1 1/2 quarts good vanilla bean ice cream
- 2 tablespoons heavy cream
- 1 teaspoon light corn syrup
- 1/4 cup semisweet chocolate chips
- 2 tablespoons chopped hazelnuts or sliced almonds
Instructions
- Add the ice cream to the bowls of a stand mixer and beat it until it is soft and spreadable about 3 minutes. Or you can allow your ice cream to sit at room temperature for 15-20 minutes until softened.
- Double line a 9″x5″ baking pan with plastic wrap, leaving enough hanging out the sides to wrap over the top.
- Combine espresso powder and water in a microwave-safe measuring cup. Heat for 1-2 minutes until it is warmed. Reserve 1/2 tablespoon espresso to use in the ganache. Pour the remaining espresso into a shallow bowl.
- Scoop about 1/3 of the soft ice cream into the bottom of the pan. Use a spatula to smooth it into an even layer. Be careful the plastic wrap will move around a little.
- Dip the lady fingers into the espresso mixture one at a time and then quickly flip to soak both sides. Only keep it in the liquid for a second or so. Line the bottom of the baking pan with a row dipped lady fingers, about 8.
- Top with about 1/3 of the remaining softened ice cream, smooth into an even layer. Repeat the lady finger layer of cookies and ice cream again and then top with 1 final layer of lady fingers. Gently wiggle the top layer of cookies into the ice cream and cover with the excess plastic wrap. Place the cake in the freezer for 3 hours-overnight.
- Meanwhile; prepare the ganache topping by heating the cream, remaining 1/2 tablespoons espresso and corn syrup in a small microwave safe bowl or measuring cup until steaming. Be careful, as the cream may bubble over if it boils. Add the chocolate chips and whisk until the chocolate is smooth. Place in the refrigerator for 15 minutes to allow it to cool.
- Remove the cake from the freezer and invert it onto a serving tray. Use the excess plastic wrap to help lift it out of the pan. If it will not come out easily. Allow it to rest on the counter for a minute until it comes out easily. Remove the plastic wrap. Transfer the ganache to a quart size bag or piping bag. Drizzle the ganache over the cake making sure to leave space between the drizzle lines so the ganache will firm up. Quickly top with nuts before the ganache sets. Freeze until ganache is set or you are ready to eat. Enjoy!
Video
Donna’s Notes
Nutrition
All nutritional information is based on third party calculations and is only an estimate. Each recipe’s nutritional value will vary depending on the ingredients used, measuring methods, and portion sizes.
Originally published July 2017, updated and republished June 2025
Disclosure: Posts may contain affiliate links. If you purchase a product through an affiliate link your price will remain the same and The Slow Roasted Italian will automatically receive a small commission. Thank you for supporting us, it helps us keep creating new recipes.


Welcome!
We’re Donna and Chad, the dream team behind The Slow Roasted Italian. Our focus is on taking complicated OUT of the kitchen. Life is busy enough, making meals should be fast and easy, to help make your life as simple as possible. Read More >>


This looks divine! I notice that the video shows dark rum (1 Tbsp ?) going into the espresso mixture, and also a splash of dark rum but no espresso in the ganache – however there is no mention of rum in the printed ingredients.
I can’t find the video!
Hi Betty,
You will find the video if you scroll down to the recipe card, hope this helps.
TSRI Team Member,
Holli
Where can I buy this?
Hi Nancy,
The recipe is below if you scroll down, it is very easy to make this cake, enjoy!
TSRI Team Member,
Holli
The lady fingers were pretty icy when eaten right from the freezer. If we had let it sit, the ice cream would be melty. Looked great and easy to make but not a fan of the lady fingers in this recipe.
A lot of work but SO worth it! IT was simply delicious and a new family favorite!