

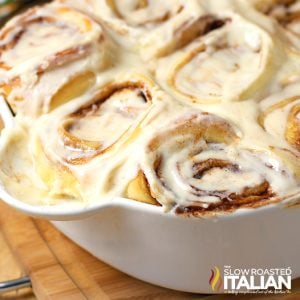
Cinnabon Cinnamon Roll Recipe (Copycat) + Video
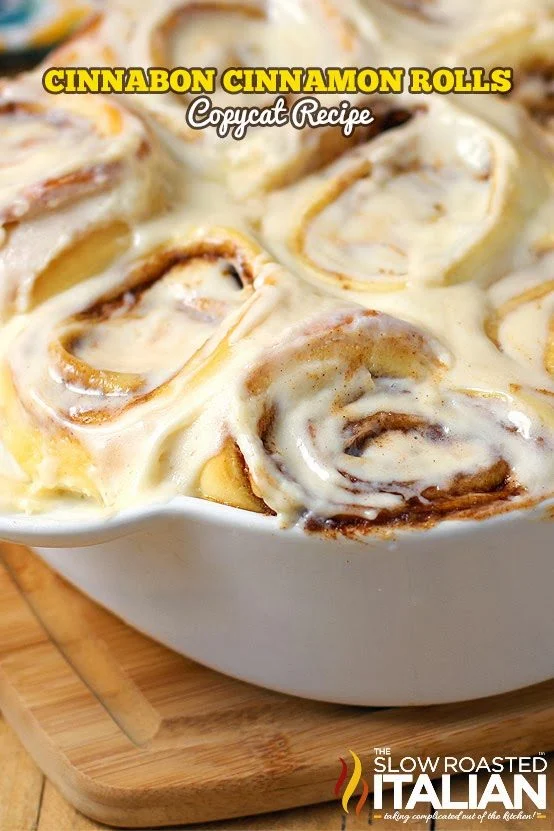
Soft, fluffy, gooey… this Cinnabon Cinnamon Roll Recipe delivers everything you remember about those food court treats, but even better and fresh from your own oven. Layers of buttery brown sugar and cinnamon melt into every swirl, and that thick cream cheese frosting? It sinks right in while they’re still warm. Sweet, rich, and completely over the top in the best way.
WHY YOU’LL LOVE THIS CINNABON RECIPE
- Tastes just like Cinnabon (maybe better!)
- Ultra-soft, fluffy dough that stays tender
- Thick, gooey cinnamon filling in every bite
- Classic cream cheese frosting that’s rich and smooth
- Perfect for make-ahead mornings or special occasions
Cinnabon Cinnamon Roll Recipe
These cinnamon rolls have a whole story behind them.
Chad first took me to Cinnabon back in 1998, and I fell hard. For the cinnamon rolls first… and then eventually for him too. Although honestly, the cinnamon rolls might’ve helped {wink}.
And all these years later, we still love them.
So, of course, I had to figure out how to make Cinnabon cinnamon rolls at home.
And this version? This is the one we keep coming back to. Soft, gooey, loaded with that cinnamon sugar filling… it just hits the same way every time.
I’ve made this Cinnabon cinnamon roll recipe for Christmas morning, the weekends, and anytime a craving hits. Because why wait for a special occasion when you don’t have to?
If you love making Cinnabon at home, our Copycat Cinnabon Cinnamon Sticks help you make even more of their sweet treats right at home!
If you love cinnamon treats, our Cinnamon Pecan Pull-Apart Bread should be your next bake!
CINNABON CINNAMON ROLLS RECIPE VIDEO
Want to see how easy these come together? Watch our quick recipe video 👇
INGREDIENT NOTES
- Active Dry Yeast: Make sure your water is warm, not hot. Using a kitchen thermometer will help. If it’s too cold, the yeast won’t bloom. Too hot, and you’ll kill it.
- Buttermilk: Adds tenderness and a slight tang that balances the sweetness.
- Eggs & Butter: Bring these to room temperature before starting this Cinnabon cinnamon rolls recipe, even for the portion of butter that needs to be melted.
- All-Purpose Flour: Add this gradually. Too much will make the rolls dense instead of soft.
- Cornstarch: Helps keep the filling soft and gooey instead of melting away.
- Brown Sugar: Packed for that deep, molasses-rich sweetness in the filling.
- Cream Cheese: Use full-fat for the best texture and flavor in the frosting.
VARIATIONS
Extra Gooey: Add a little extra butter and brown sugar to the filling.
Pecan Crunch: Sprinkle chopped pecans over the filling before rolling the dough.
Orange Cream Cheese Frosting: Add a bit of orange zest to the frosting.
Lighter Sweetness: Reduce the amount of brown sugar slightly.
Single Pan Batch: Bake all of the Cinnabon cinnamon rolls in one pan for softer edges.
Overnight Rolls: Assemble the night before and bake fresh in the morning.
SERVING SUGGESTIONS
- Pair with a strawberry banana smoothie for something fresh on the side.
- Serve warm with coffee and our Easy Breakfast Casserole for a full spread.
- Add rolls to a brunch table with our Baked French Toast Casserole.
- Serve this Cinnabon recipe alongside sausage breakfast sliders for a sweet and savory mix.
- Enjoy one warm… standing at the counter… before anyone else gets to them!
CINNABON CINNAMON ROLLS FAQ
Yes. Assemble, refrigerate, then let them sit at room temp before baking.
Usually too much flour or not enough rise time. The dough should be soft and slightly tacky.
It’s recommended for flavor and texture, but you can substitute with milk plus a little lemon juice.
Spread some frosting onto the rolls while they’re warm so it melts in, then add the rest after.
HOW TO MAKE CINNAMON ROLLS WITHOUT A MIXER
With a little bit of elbow grease, you can mix the dough by hand instead.
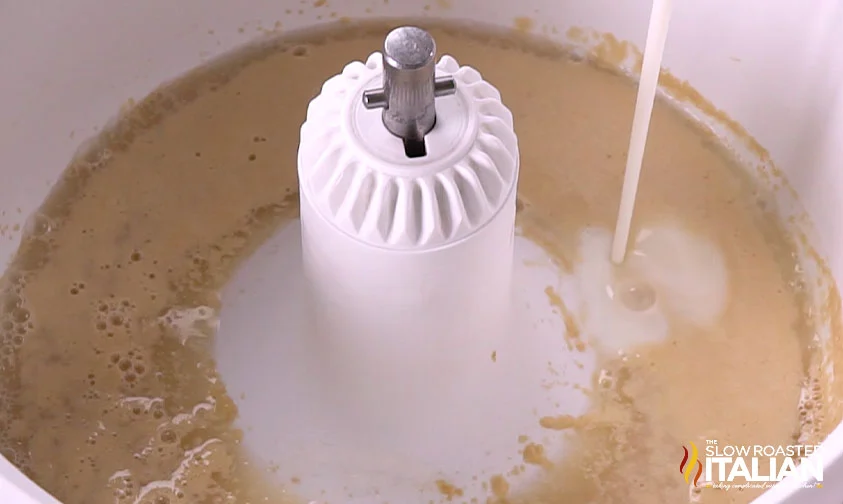
- Activate the yeast. Combine water, yeast, and sugar in a large bowl and let the mixture sit for 5-10 minutes until foamy. Then, stir in the buttermilk, eggs, and melted butter.
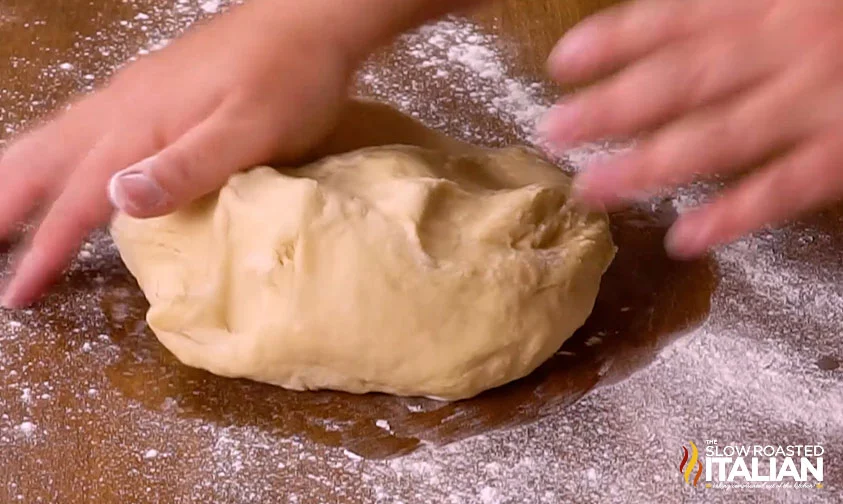
- Form the dough. Add the salt and flour and mix until you can no longer stir with a spoon.
- Knead. Turn the dough out onto the floured countertop and knead for 3-5 minutes. Once the dough is no longer sticky, add it to an oiled bowl for the first rise. Continue the Cinnabon cinnamon roll recipe from there.
I’ve made this recipe of cinnamon rolls from Cinnabon enough times to know… the dough tells you everything.
If it feels too firm while you’re mixing, it probably is. That’s where people go wrong. They keep adding flour until it’s easy to handle, but that’s not what you want here.
You want soft. Slightly tacky. That’s what gives you that fluffy, pull-apart texture.
And the double frosting? That’s not extra. That’s intentional.
The first layer melts into the rolls, the second sits on top. That’s how you get that true Cinnabon-style finish.
DONNA’S PRO TIPS
- Check your yeast. It should foam before moving on to the next step.
- Don’t overflour the dough. Soft dough = soft rolls.
- Roll tightly so the swirls hold their shape.
- Use a sharp knife or kitchen floss for clean cuts without squishing the rolls.
- Let the rolls fully rise. Don’t rush this step!
- Rotate pans halfway for even baking.
- Frost in two layers for that signature finish.
TOOLS NEEDED
- Stand Mixer with Dough Hook: Makes kneading easy and consistent.
- Mixing Bowls: For dough, filling, and frosting.
- Rolling Pin: To get that large, even rectangle.
- 9×13 Baking Dishes: Gives the rolls space to rise and bake evenly.
- Sharp Knife or Bench Scraper: For clean cuts without squishing the rolls.
Enjoy!
With love, from our simple kitchen to yours.
Don’t miss a thing! Follow us on
Facebook| X | Pinterest| Instagram
Other Favorite Breakfast Recipes


🍔 Copycat Creations Vol 1
Craving your favorite restaurant meals at home? This exclusive ebook has the boldest, most requested copycat recipes — from fast food faves to sit-down classics.
👉 Buy your copy now and start cooking the meals you love!
TL;DR (Too Long, Didn’t Read) THE QUICK VERSION
- Soft, gooey copycat Cinnabon cinnamon rolls
- Fluffy dough with rich brown sugar filling
- Cream cheese frosting goes on warm and again after
- Don’t overflour — dough should be soft and slightly tacky
- Let the rolls rise fully for best texture
- Great for make-ahead or overnight prep
- Bake until just golden, not overdone
- Classic, indulgent, and absolutely worth it
Cinnabon Cinnamon Roll Recipe (Copycat)
Ingredients
Rolls
- 1 tablespoon unsalted butter
- 2 1/4 teaspoons active dry yeast, 1 packet
- 1 cup warm water, 110 to 120°F
- 1/2 cup granulated sugar
- 1/4 cup buttermilk
- 2 large eggs
- 7 tablespoons unsalted butter
- 5 1/2 to 6 cups all-purpose flour
- 2 teaspoons kosher salt
Filling
- 1 stick unsalted butter, softened, 1/2 cup
- 1 1/2 cups packed light brown sugar
- 2 tablespoons ground cinnamon
- 1 tablespoon cornstarch
Frosting
- 4 ounces cream cheese, softened
- 1/2 stick unsalted butter, softened, 1/4 cup
- 1 cup powdered sugar
- 1/2 tablespoon fresh lemon juice
- 1 teaspoon vanilla extract
- 1/2 teaspoon kosher salt
Instructions
- PREHEAT AND PREP PANS: Preheat the oven to 350°F. Grease two 9 x 13 inch baking dishes with 1 tablespoon unsalted butter
- ACTIVATE YEAST: In the bowl of a stand mixer, combine 1 cup warm water and 1/2 cup granulated sugar. Sprinkle 2 1/4 teaspoons active dry yeast, 1 packet over the top and stir gently. Let sit for 5 to 10 minutes until foamy.
- MELT BUTTER: Melt 7 tablespoons unsalted butter and set aside to cool slightly.
- MAKE DOUGH: Add 1/4 cup buttermilk, 2 large eggs, and the melted butter to the yeast mixture. Mix on low speed. Add 5 1/2 to 6 cups all-purpose flour, 1 cup at a time, then add 2 teaspoons kosher salt. Continue adding flour slowly until a soft dough forms, about 5 ½ to 6 cups total.
- KNEAD DOUGH: Knead with a dough hook on medium speed for 5 minutes until the dough is smooth and slightly tacky. The dough should be soft but not sticky.
- FIRST RISE: Transfer the dough to a lightly greased bowl if needed. Cover loosely and let rise in a warm place for 60 to 90 minutes until doubled in size.
- MAKE FILLING: In a medium bowl combine 1 1/2 cups packed light brown sugar, 2 tablespoons ground cinnamon, and 1 tablespoon cornstarch. Stir until well combined.
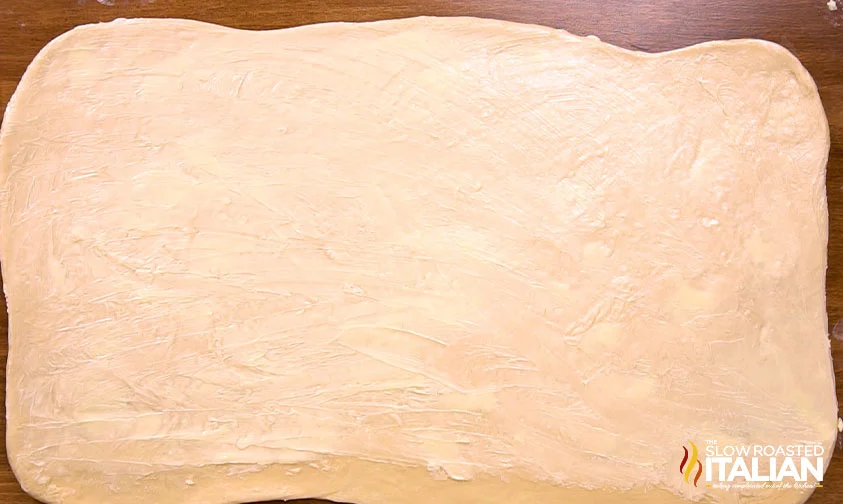
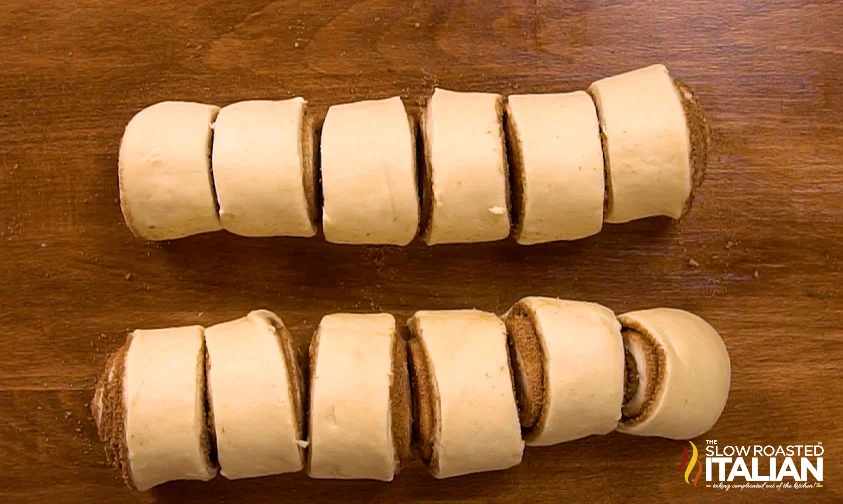
- ROLL DOUGH: Turn the dough onto a lightly floured surface and roll into an 18 x 24 inch rectangle.
- ADD FILLING: Spread 1 stick unsalted butter, softened evenly over the dough, leaving a 1 inch border along one long edge. Sprinkle the brown sugar mixture evenly over the butter and press gently so it sticks.
- ROLL AND CUT: Starting from the long edge, roll the dough tightly into a log. Pinch the seam to seal. Cut into 12 equal rolls.
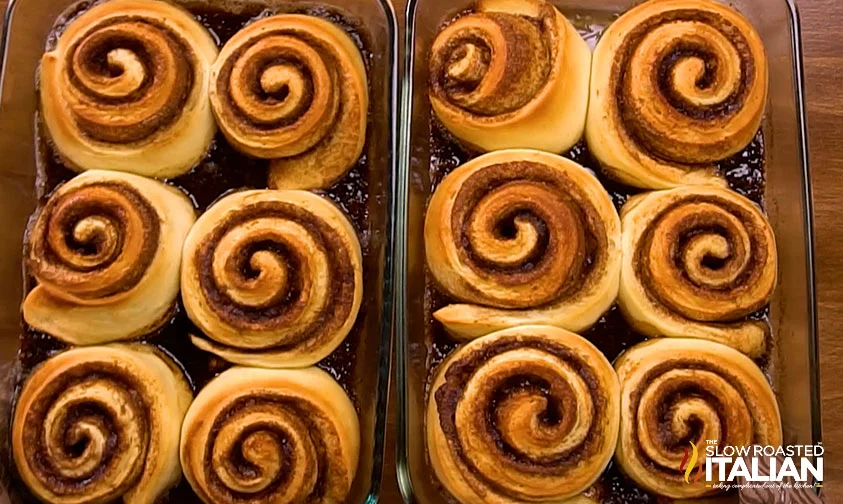
- SECOND RISE: Place 6 rolls in each prepared baking dish, spacing them evenly. Cover and let rise for 60 to 90 minutes until doubled in size.
- BAKE: Bake for 18 to 22 minutes until golden brown, rotating pans halfway through baking.
- MAKE FROSTING: In a large bowl beat 4 ounces cream cheese, softened and 1/2 stick unsalted butter, softened until smooth and fluffy. Add 1 cup powdered sugar, 1/2 tablespoon fresh lemon juice, 1 teaspoon vanilla extract, and 1/2 teaspoon kosher salt. Beat for 3 to 5 minutes until light and creamy.
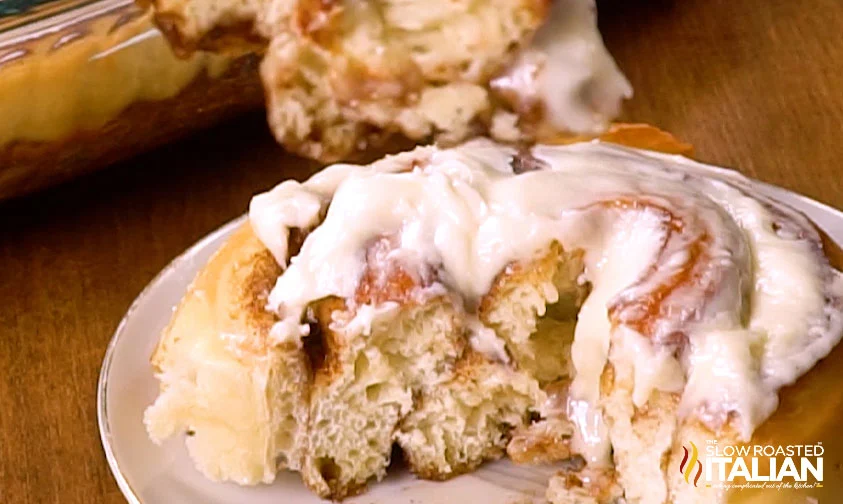
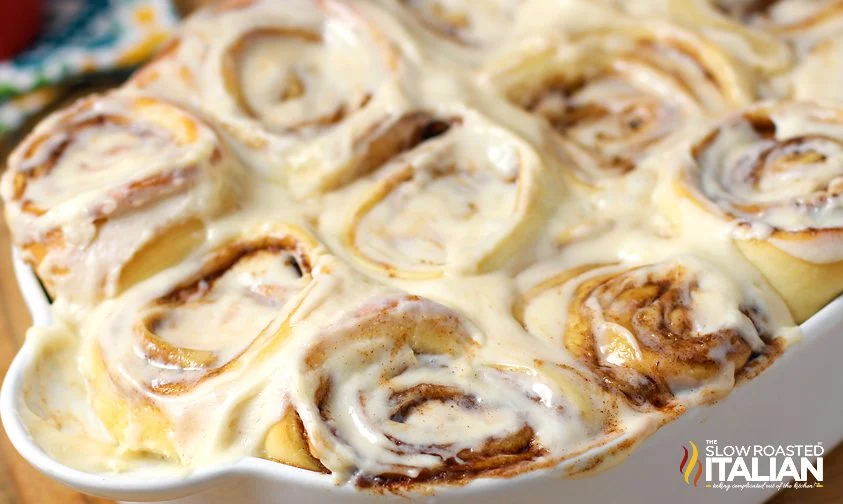
- FROST ROLLS: Spread half of the frosting over the warm rolls. Let cool slightly, then spread the remaining frosting on top.
- SERVE: Serve warm and enjoy.
Video
Donna’s Notes
Nutrition
All nutritional information is based on third party calculations and is only an estimate. Each recipe’s nutritional value will vary depending on the ingredients used, measuring methods, and portion sizes.
Originally published November 2013, updated and republished May 2026
Disclosure: Posts may contain affiliate links. If you purchase a product through an affiliate link your price will remain the same and The Slow Roasted Italian will automatically receive a small commission. Thank you for supporting us, it helps us keep creating new recipes.


Welcome!
We’re Donna and Chad, the dream team behind The Slow Roasted Italian. Our focus is on taking complicated OUT of the kitchen. Life is busy enough, making meals should be fast and easy, to help make your life as simple as possible. Read More >>


Hi, I have justa baked a batch of these rolls and I have poured frosting on them but we are not going to eat them until tomorrow. Should I keep them in the refrigerator or is it OK if I leave them on the counter?
These turned out really good even though I messed up the recipe in several places (I was tired). I ran out of AP flour and had to use 2 cups of whole wheat. Even with the whole wheat flour, even then the dough was sticky. I was short on time so I only did a 30 minute rise in a warm oven. The kids loved them and my fiance ate 2. Would definately make again.
Thanks, Amber! We are so happy everyone enjoyed them!
This comment has been removed by a blog administrator.
Has anyone tried this recipe using gluten free flour?
Hi Donna,
Your recipes are always awesome! I hate to be so dense, but I never can find your recipe videos.
Thanks for your help,
Sharon
Where is the video for the Cinnabon rolls, they look amazing. Thank you
Hi Donna Coffman! The video is at the top of the page, enjoy!
OMG! These are fabulous! We discovered we didn't care for the lemon in the frosting, so have left that out after first batch. Yum yum yum. Thank you so much for all you do for us amateur bakers!!
These have ruined me! That is a good thing though. Cinnabon used to be my favorite cinnamon roll but these outshine Cinnabon any day of the week. We especially like these on Thanksgiving and Christmas, but I will make them anytime I get a craving for a good cinnamon roll because going to Cinnabon is no longer an option. Thank you for sharing this recipe!
Can the recipe be cut in half?
Great recipe for a beginner! Only issue I had was that it seemed to be too much flour. I only used 5 cups and turned out great. My stand mixer couldn’t handle that much dough so I did have to knead by hand.
Substitute gluten free flour for all purpose flour? How does it taste, rise, look? Any other changes?
WOW! I used lemon juice and whole milk instead of buttermilk and you couldn't tell any difference. I also doubled the frosting recipe. I made these for the first time this evening and my husband and I both had to close our eyes and smile on first bite. The best. We're always looking for little traditions, and this recipe will be our Christmas morning treat. I read someone having the rolls dry out, about 10 min. in I turned the heat way way down. It may also help to put a pan/dish of a little water at the bottom of the oven to steam them and keep them moist.
There is no video on this page!!
These came out so good, the whole family loved them. We don’t have a cinnabon near us, so it’s nice to have something like this to throw together every once in a while.
I’ve made these probably a dozen times over the last several years, and I have to say, it never goes wrong. perfectly predictable results every single time. they are our Christmas breakfast every year and often get made on rainy weekend days. They are about a 5 hour ordeal for me, but I hand mix the dough. Thanks so much for sharing this one. Many families connected to mine have enjoyed them and also use your recipe now
Hi Sam,
That is awesome! We are so happy everyone enjoys them. They are a lot of work but so worth it! Have a great day!
TSRI Team Member,
Holli
These sound so delicious! I tried watching the video but only get audio, no video. Will you please help? Thanks!
Well The Directions are For 1× 2× 3× So There is a Few choice’s in the size you can make. 1×usually gives you a decent amount for one or two people to share.
No ingredients amount given. Unable to make,
Hi Rosemarie,
The amounts are on the recipe card at the bottom.
TSRI Team Member,
Devlyn
My family loves these! I make them every Christmas Eve for Christmas morning breakfast. I follow the directions to a tee and they come out just right every time. Even the part where they slowly rise overnight in the refrigerator.
Hi Michelle!
We’re so glad you enjoyed!
TSRI Team Member,
Devlyn
these rolls were AMAZING! i couldn’t believe how easy they were to make. donna and chad, you’ve outdone yourselves!
Hi Daisy!
We’re so glad you enjoyed!
TSRI Team Member,
Devlyn
donna’s recipe for these cinnamon rolls is pure perfection! i followed it exactly as written, and they turned out amazing. so close to the restaurant version!
Hi Grace!
We’re so glad you enjoyed the recipe!!
TSRI Team Member,
Devlyn
OMG, these cinnamon rolls are to die for! so delicious and the recipe was a breeze to follow.
Hi Michael!
We’re so glad you enjoyed the recipe!!
TSRI Team Member,
Devlyn
These are my go-to cinnamon roll recipe, and have been for years! My husband is obsessed with them, and I make them each year on our anniversary and for Christmas morning.
I do have a question though- if I need to make them in advance, can I freeze the rolls right before they’re to go in the oven, and then defrost and cook when I need them?
Hi Jelisa!
We’re glad you enjoyed! Yes, you can freeze the rolls before glazing and going in the oven.
TSRI Team Member,
Devlyn
Hi Donna,
Donna King here from Tennessee. This looks like a lot for just the two of us. So wondering if I can make these, slice them up & freeze them? Then get out what we need, thaw overnight in fridge and pop them into the oven and bake up a batch to do for a few days??? Not sure how to handle the frosting, can it freeze also??? Thank you, please email me the answer. Hugs, love your recipes! Been using them for years!
This is a great recipe. These cinnamon rolls remind me of how Cinnabon used to make them.
Hi Denise!
So glad you enjoyed our recipe!!
TSRI Team Member,
Devlyn