

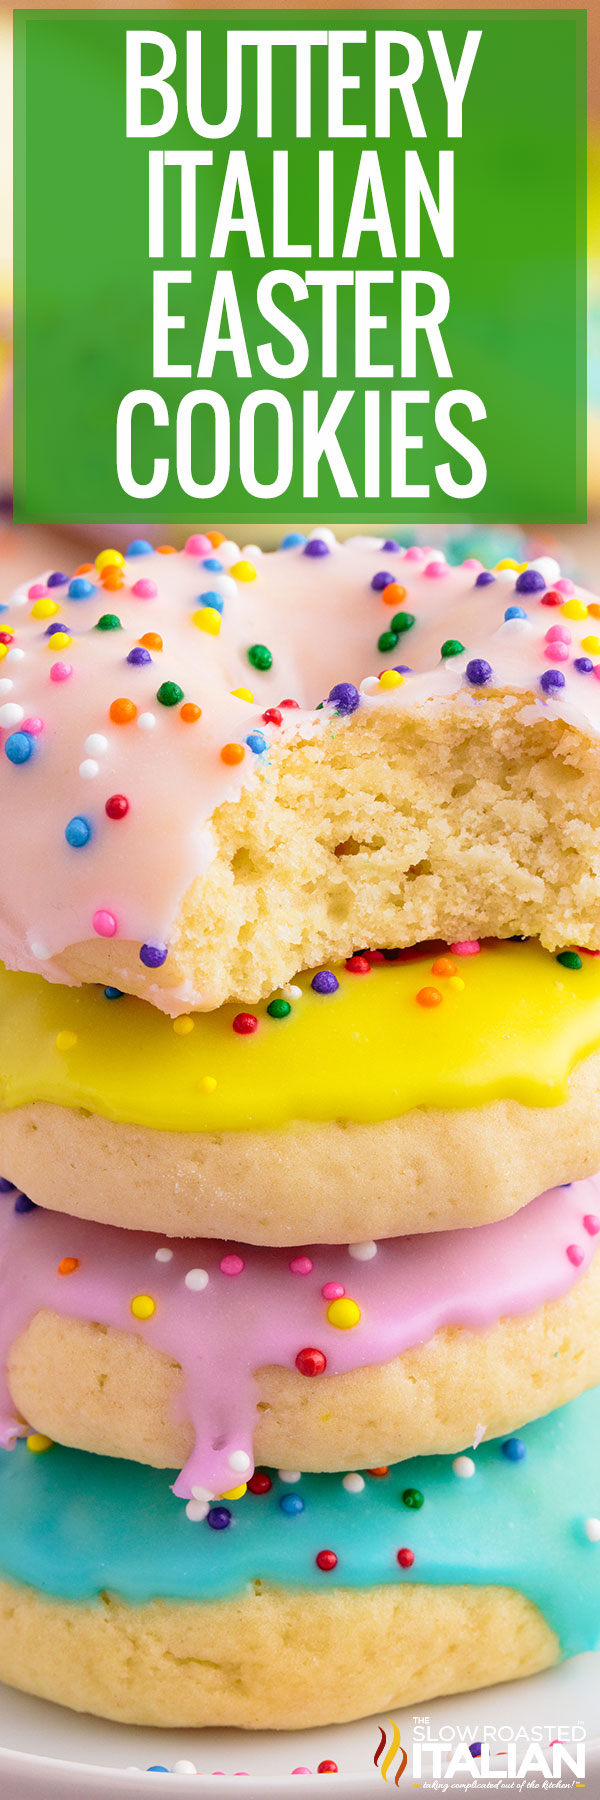
Italian Easter Cookies Recipe (Soft & Buttery)
Italian Easter Cookies are perfectly tender and melt-in-your-mouth delicious! This is one of my family’s favorite Italian Easter desserts, and I think it will be one of your favorites, too! When it comes to a fun Easter cookie recipe, this simple recipe will get you the best results!
Imagine your favorite sugar cookie, but with a soft, pillow-y, and thick texture that’s completely irresistible — that’s exactly why we love these easy Easter cookies so much!
You’ll need to make a double batch of these Italian butter cookies because they’ll be gone in no time. Luckily, the process is simple and kids can even help decorate.
Now is the perfect time to make this sweet treat.
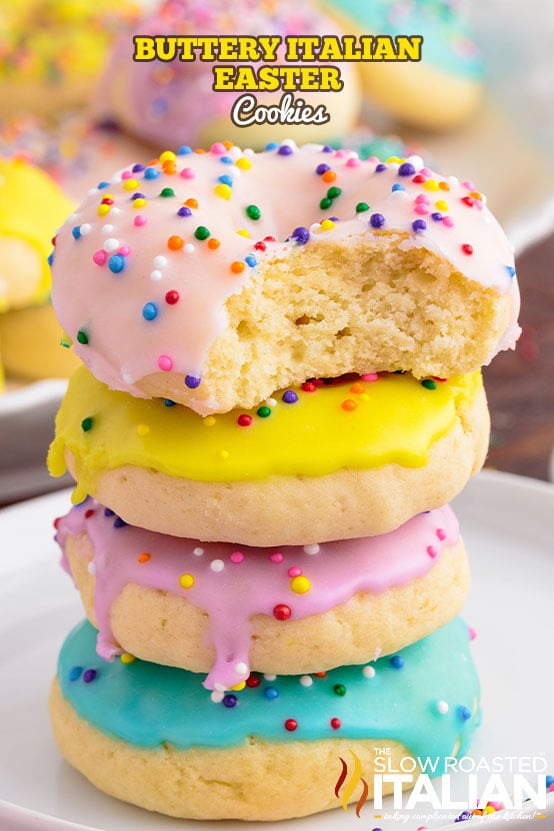
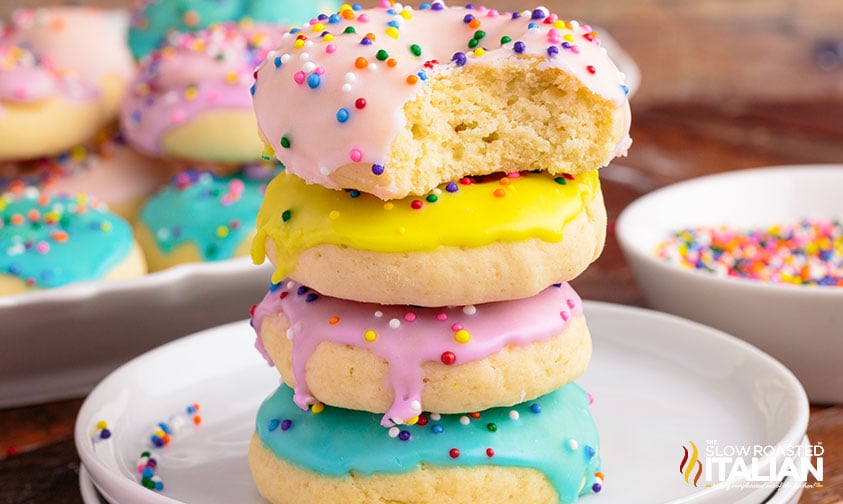
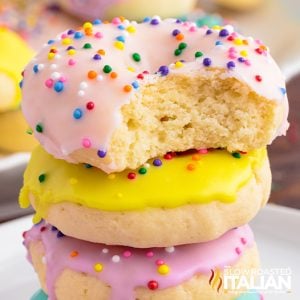
Italian cookies like this are topped with fun pastel colors of sprinkles and make the perfect cookie for Easter Sunday. (I also think that this is the perfect breakfast cookie, too. Don’t judge.)
What I love about this great recipe is that it makes a giant batch of tender cookies. I’m all about cookie textures and mouth feel, and this recipe does not disappoint!
I make these all the time during the Easter season because the pastel sprinkles on top make them festive and fun.
I also love that these simple Italian cookies are a fun project to do together in the kitchen, with the end result being a sweet cookie (or two) that we can dine on right away.
The printable recipe card shows you have to make these delicious Italian Easter cookies, which would be perfect for your Easter dessert table.
Gather the cookie sheets, and get ready to make a batch of these delicious cookies! (they’re sure to be a hit!)
Italian Easter Cookies Recipe
Looking for more festive holiday cookies to bake? Create brightly colored circus animal cookies for Easter, Christmas, or anything in between!
Our cannoli’s also make a great dessert, the filling is amazing!
You can also play with different shapes and festive sprinkles to match spritz cookies to any occasion. Or try this peeps marshmallow fudge that the kids will love!
Italian Easter Cookies Recipe Tips and Tricks
- Bring butter and eggs to room temperature. This is essential for creating a smooth dough, and it helps the other ingredients incorporate faster as well.
It wouldn’t hurt to measure out the milk to warm on the counter as well. - Don’t overwork the dough! It will be just a little bit sticky, but a light dusting of flour on your work surface is plenty to prevent sticking while rolling out the logs.
And since it’s already nice and thick, it won’t need to be refrigerated first. - Form the shapes gently. Be careful not to smash the dough when tying the knots — they will puff up in the oven, so it’s fine if they aren’t tightly secured.
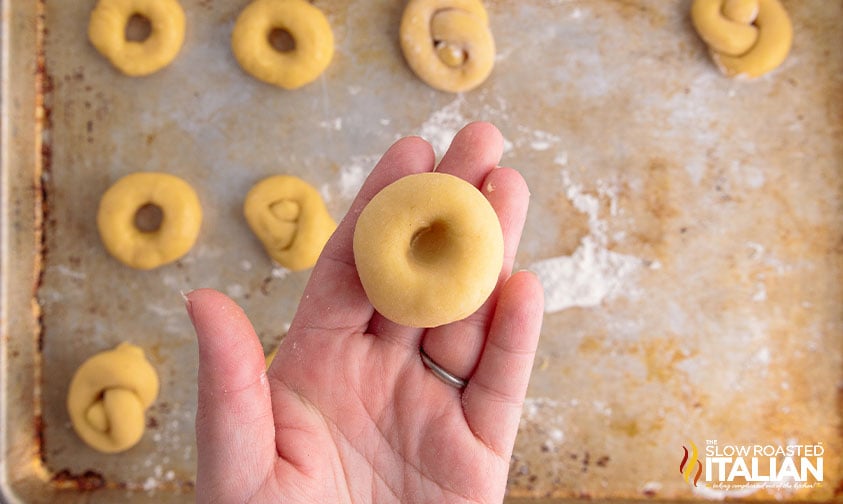
For the donut shape, wrap the log around your finger and pinch the ends together. Then, gently roll at the seam to round it out. - Tip for baking: These easy Easter cookies are best when the bottoms just start to turn golden brown.
I found that 9 minutes was just the right amount, so they are cooked through but still soft and tender.
Do your best to get the strips of dough into equal pieces so that when you start to make the knot of these traditional Italian Easter cookies, you’ll have cookies that are pretty similar in size.
You don’t want to have a bunch of large cookies and then a few smaller cookies because you want them to cook bake evenly in the oven.
You can practice a bit on the dough before putting them on the prepared baking sheets, but remember to not overwork the piece of dough!
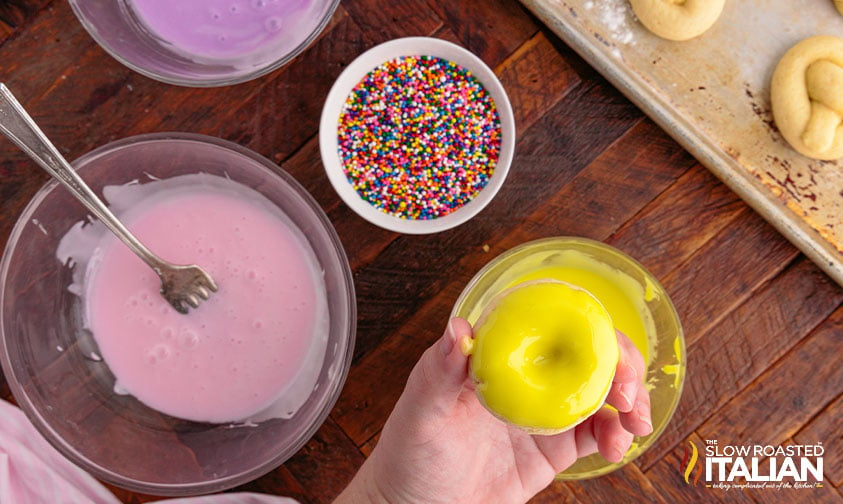
How To Color Cookie Icing
First, opt for gel coloring — you can achieve gorgeous pigmented colors with a fraction of the drops needed with the traditional liquid version.
Since we’re aiming for pastels, use the tiniest drop to start and mix thoroughly into the glaze. You can always add a little bit more if desired.
For these Italian Easter cookies, I used Americolor gel food coloring in: Lilac, Fuschia, Sky Blue, and Lemon Yellow.
Italian Butter Cookies FAQ
These decorated Easter cookies are fine at room temperature for 4 to 5 days, or they can be frozen for up to 1 month. Store in an airtight container to keep them soft and moist. I’m not a big fan of chilled or cooled cookies, so I let mine set out at room temperature for a couple of minutes if I’ve stored them in the fridge.
Yes! Quite often, decorated Easter cookies are piped using different pastry tips to create interesting shapes and textures all from the same batch of dough.
This technique allows you to create a decorative platter without spending hours and hours in the kitchen.
This classic Italian cookie is one of those holiday recipes that pairs well with so many occasions and things. Not only is it so much fun to make this traditional Italian cookie, but the loose knot is a signature look that people love to receive in their Easter baskets!
These traditional cookies pair really well with a cup of coffee, or a cup of chocolate milk. The kids will love the colorful sprinkles, so be ready for them to go fast. You can enjoy these on Good Friday, or anytime that you want to nibble on this traditional recipe.
They’re yummy on Easter morning, or can really be made during Christmas time, too.
Enjoy!
With love, from our simple kitchen to yours.
Don’t miss a thing! Follow us on
Facebook| X | Pinterest| Instagram

Other Easter Dessert Recipes

Italian Easter Cookies Recipe (Soft & Buttery)
Equipment
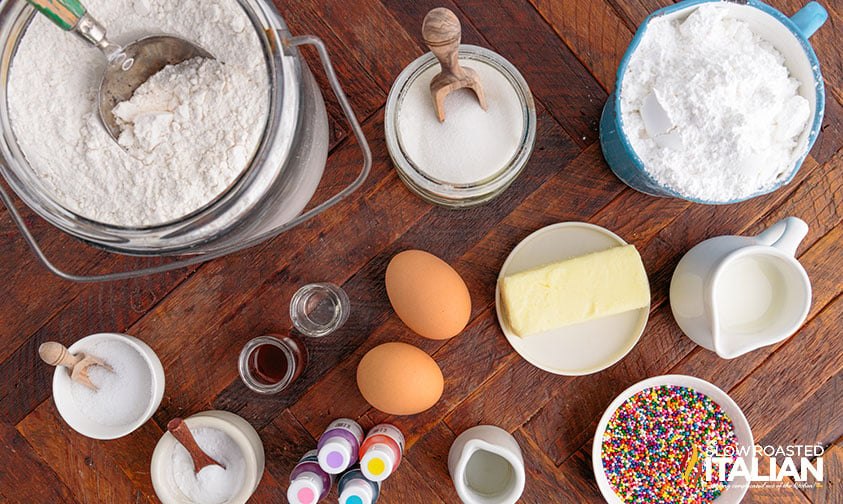
Ingredients
- 6 tablespoons unsalted butter, room temperature
- 1/2 cup granulated sugar
- 2 large eggs, room temperature
- 2 teaspoons vanilla extract
- 1 teaspoon almond extract
- 2 tablespoons whole milk
- 2 cups all-purpose flour
- 2 teaspoons baking powder
- 1 teaspoon salt
Icing
- 3 cups powdered sugar
- 2-4 tablespoons whole milk
- 2 tablespoons light corn syrup
- 1 teaspoon almond extract
- gel food coloring, in purple, pink, blue and yellow
- rainbow sprinkles
Instructions
- Preheat oven to 350°F.
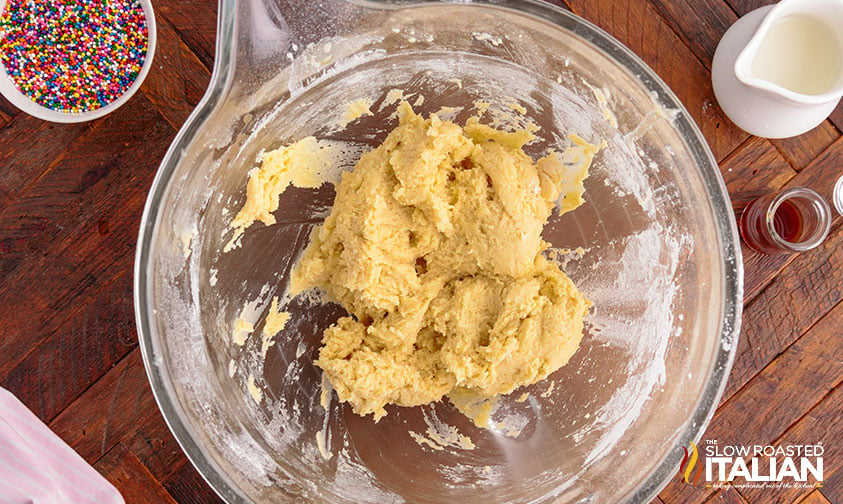
- In a mixing bowl, beat together butter and sugar until creamed.Add eggs one at a time, beating to combine between each.
- Beat in vanilla and almond extracts. Mixture will be pale yellow and slightly separated.
- In a separate bowl, sift together flour, baking powder, and salt.
- Add half of the milk to the butter/sugar mixture, then half of the flour mixture, the remaining milk, and then the remaining flour. Mix just until combined, scraping the bowl as needed.
- Use a 1 ½ tablespoon cookie scoop to form scoops of dough. Place each scoop of dough on a lightly floured surface and roll into a 6-7” log. Twist the log into a knot for half of the cookies. For the other half of the cookies, form donut shapes by joining the two ends of the log together – or simply roll the scoop of dough into a ball and then press your finger down into the center of it to make a hole, shaping the “donut” around your finger.
- Place cookies on a baking sheet lined with parchment paper.Bake for about 9 minutes or until the bottoms of the cookies are just slightly golden brown.
- Transfer cookies to a cooling rack to cool.
- Meanwhile, whisk together all of the icing ingredients to form a smooth glaze. Divide the glaze between four bowls and add a tiny drop of gel food coloring to each bowl. Stir to distribute the coloring evenly throughout the glaze.
- Dip a cooled cookie into the glaze; hold it above the bowl for a few seconds to allow the excess glaze to drip off. Place on a sheet of parchment paper and sprinkle with nonpareils. Leave untouched until glaze sets and is dry to the touch.
Donna’s Notes
Nutrition
All nutritional information is based on third party calculations and is only an estimate. Each recipe’s nutritional value will vary depending on the ingredients used, measuring methods, and portion sizes.
Originally published March 2022, updated and republished February 2025
Disclosure: Posts may contain affiliate links. If you purchase a product through an affiliate link your price will remain the same and The Slow Roasted Italian will automatically receive a small commission. Thank you for supporting us, it helps us keep creating new recipes.


Welcome!
We’re Donna and Chad, the dream team behind The Slow Roasted Italian. Our focus is on taking complicated OUT of the kitchen. Life is busy enough, making meals should be fast and easy, to help make your life as simple as possible. Read More >>


I don’t usually make easter desserts, but since having more kids in the family I decided to give it a shot. These were a major hit with all of the kiddos, definitely saving this recipe for year round.
These were perfect! Need to work on my knotting technique, but they came out so pretty and yummy. No need to include corn syrup in the glaze, as I don’t keep it on hand. These will definitely be in my regular rotation!
Best recipe ever! Absolutely better than grandmas! Thank you. This will be my go to recipe for the holidays.
Soft and buttery. I shaped some into knots and others into a “S” like my Nannie used to do. Delicious and haven’t even frosted yet!
Hi Lois!!
We’re so glad you enjoyed the recipe.
TSRI Team Member,
Devlyn
Can I I’ll meet the almond extract as I have a nut allergy will they still taste just as good.
Hi Debra!
Sure! The taste may differ a bit (Be extra sweet). Hope this helps!
TSRI Team Member,
Devlyn
my kids have nut allergies and I use imitation almond extract.
These cookies are absolute perfection! So delicious and easy to make. A must-try recipe!
Hi Eva!
We’re so glad you enjoyed!!
TSRI Team Member,
Devlyn
I followed Donna’s recipe for these Italian Easter cookies, and they turned out absolutely amazing! I added a pinch of lemon zest for a citrusy twist. So easy and delicious!
Hi Michelle!
I’m glad you enjoyed the recipe!!
TSRI Team Member,
Devlyn