

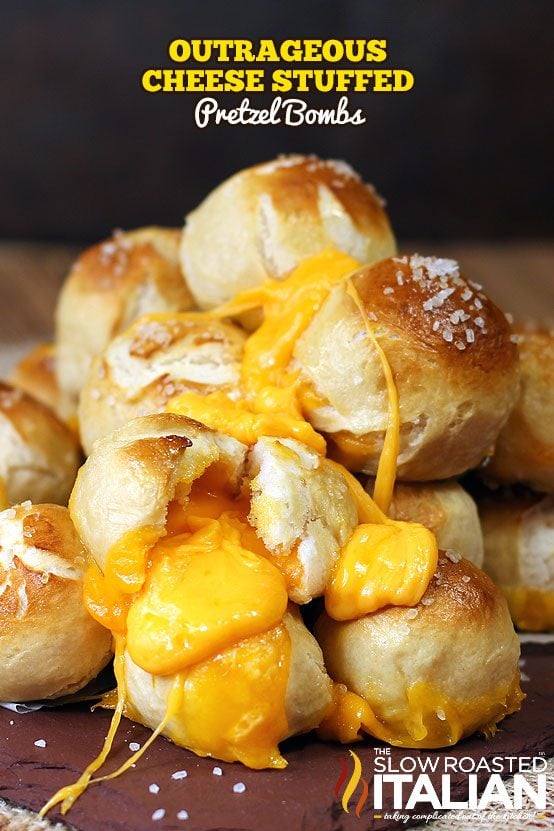
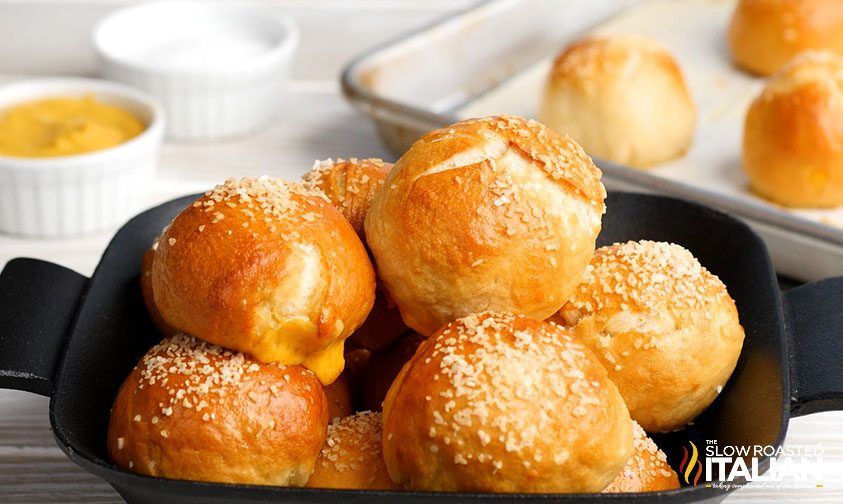
Ooey Gooey Soft Pretzels With Cheese Center + Video
Soft Pretzels with Cheese are only made better with this stuffed pretzels recipe! Combine homemade pretzel dough with ooey-gooey melted cheddar to make the best stuffed pretzels — perfect food for any party!!
If you’ve never made homemade pretzel bites, you’re in for a treat. Simple ingredients magically make a piece of dough, that you then get to cut into equal pieces.
After that, the recipe card below shows you all the simple steps to whip up these cheese pretzels – and let me tell you, they’re worth it!
You can make these for game day or have them as a great option for parties.
I love covering them with cheese, but you can also use bagel seasoning, garlic powder, coarse sea salt, or anything else that you’re craving for this soft pretzel recipe.
Parmesan cheese is always a great pairing with these soft pretzel rolls, too!
Easy recipes like this make simple homemade pretzels and are so much better than anything you’d buy premade at grocery stores.
Just be sure to have a sharp knife, and a clean work surface, and you’ll be whipping up these salty pretzels in no time at all. Who knew that pretzel recipes could be so simple?
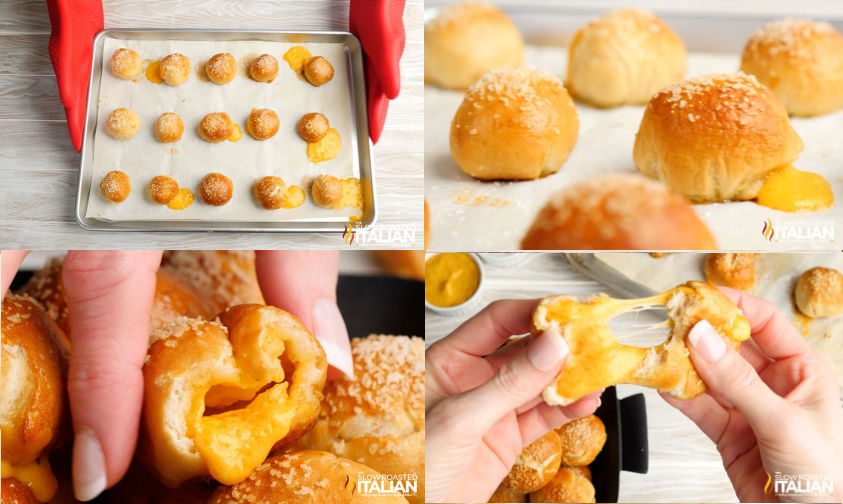
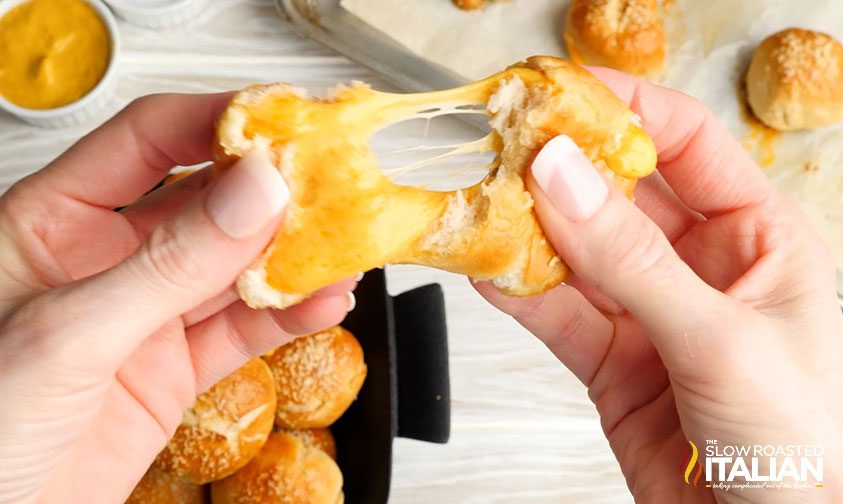
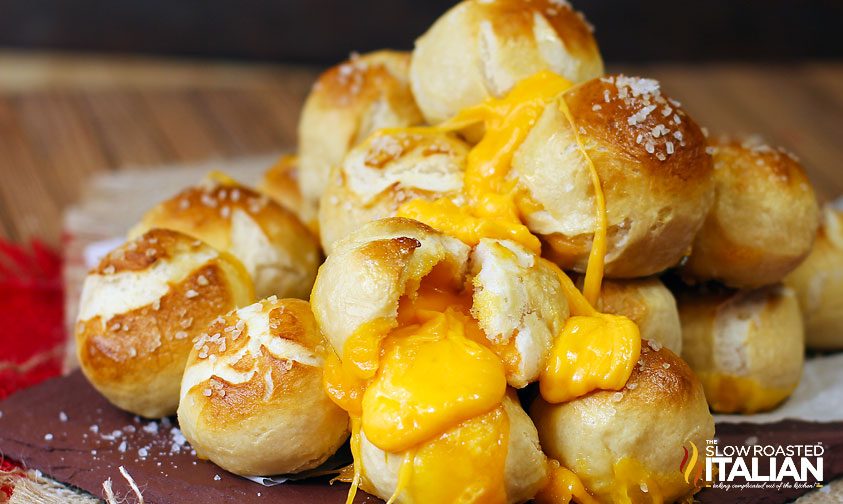
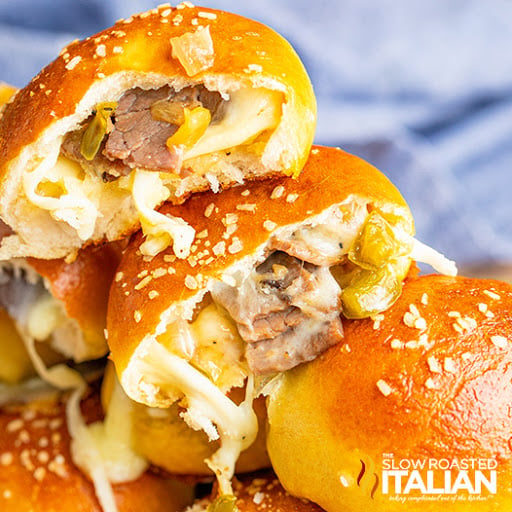
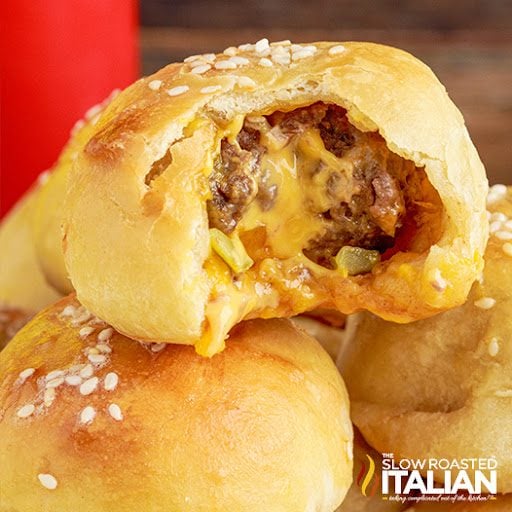
Your first bite will be full of melty cheddar cheese – and you’re sure to be hooked! (you can also use sharp cheddar cheese, white cheddar, or any real cheese options or additions that you want! As long as the cheese melts, you’re good to go!)
Pretzels With Cheese
Homemade soft pretzels are much easier to make than you think, and they can be enjoyed in a variety of different ways.
If you don’t like cheese filled pretzels, try regular Soft Pretzel Bites instead. They’re ready in just 30 minutes and make an easy, portable snack.
Homemade Pretzel Dogs are great for dinner any night of the week and can be made ahead of time and frozen.
Ingredient Notes and Substitutions
- Pretzel bread – Make your own dough for cheesy pretzels with active dry yeast, warm water, sugar, salt, and flour.
You can also use frozen dinner rolls in a pinch. You don’t even have to make the pretzel shape for this recipe! - Cheese – I like to use mild cheddar cheese for stuffed pretzels because the flavor isn’t too overpowering.
- Baking soda – This is the secret ingredient for homemade pretzel bread! Add it to the water before boiling soft pretzels with cheese.
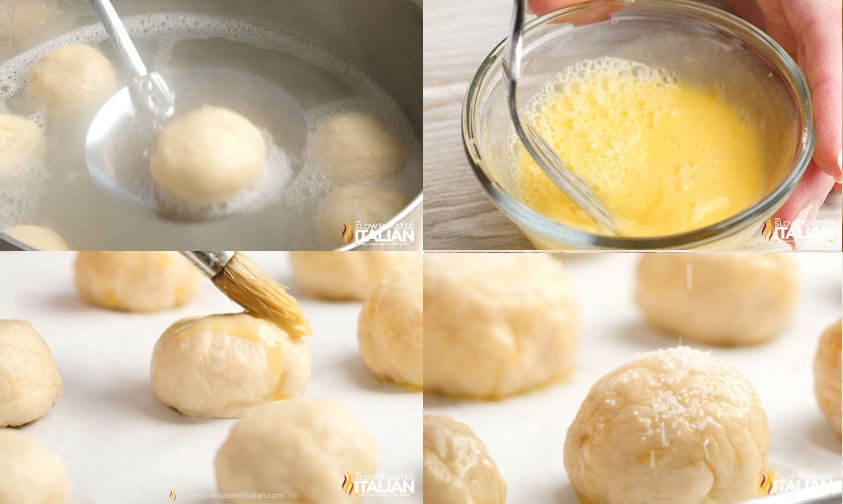
- Egg – Whisk this really well, then brush it over the cheese filled pretzels before baking. It helps them get that gorgeous golden brown color!
If you want to add any type of seasonings as a topping, you can add cayenne pepper for a kick of heat or even a little bit of melted butter and kosher salt on top of the baked pretzels.
How to Make Stuffed Pretzels
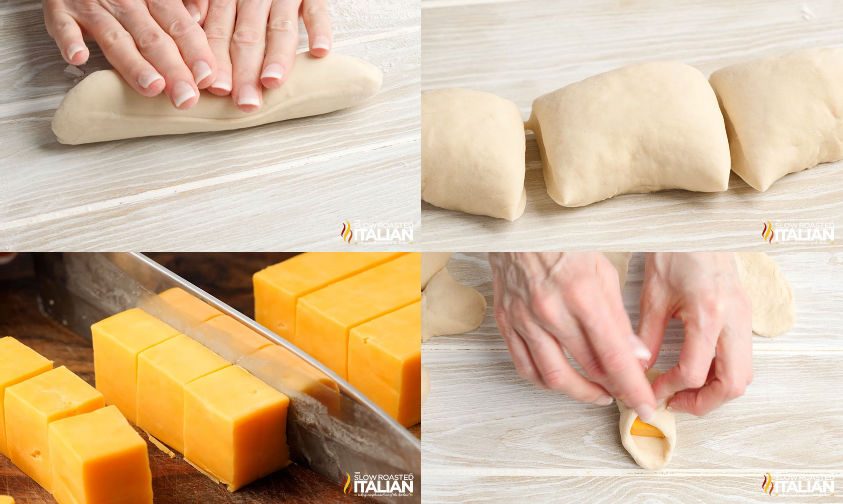
Wrap cubes of cheddar cheese inside homemade dough balls, then boil quickly in water with baking soda.
Doing so allows the pretzel balls to darken in the oven and gives them the crispy, yet chewy texture they’re known for.
Once cooled, brush the cheese filled pretzels with egg wash and sprinkle with coarse salt. Then, bake until browned and enjoy!
3 Ways to Make Pretzel Bread
- With a stand mixer – Not only does it do the hard work for you, but it also frees up your hands to prep the other ingredients.
- By hand – You can mix the dough by hand if needed. Combine the water, yeast, and sugar. Once the yeast blooms, stir in the salt and flour and mix well.
Then, turn out the dough onto a floured surface and knead for 3-5 minutes until tacky. - Ready to use frozen dough – To save both time and effort, feel free to use a package of frozen dinner rolls to make pretzels with cheese.
Just thaw and use in place of the dough recipe. I like to use Rhodes, but any brand will work just fine.
Kitchen Tools You Will Need
- Stand Mixer – A good stand mixer makes all your recipes easier. You’ll need the dough hook attachment for this recipe.
- Wooden dowel rolling pin – Perfect for small jobs like making any of our stuffed bread bombs! It’s also great for noodles, dumplings, and turnovers, and it even has a ruler on the rolling pin.
- Basting Brush – I like this one over the silicone ones.
Serving Suggestions
Enjoy cheesy pretzels as-is or dip them in your favorite dipping sauces. You can’t go wrong with honey mustard or extra cheese sauce. Even beer cheese would be tasty!
You can also serve soft pretzels with cheese alongside a warm bowl of chili or soup as a replacement for traditional dinner rolls!
Storing and Freezing Cheesy Pretzels
Pretzels with cheese will stay fresh in the refrigerator for up to 5 days if covered. Or, freeze in an airtight container for up to 2 months.
Reheat in the microwave or oven until soft and warmed through.
Soft Pretzels with Cheese FAQ
Mild cheddar is less aged, so it melts better than older cheddars like medium or sharp, but feel free to give it a try. Pepper Jack or jalapeno cheddar is a great choice for a little extra kick.
You could even use cream cheese or low-moisture mozzarella, then dip the soft pretzels in marinara sauce!
Absolutely! This stuffed pretzels recipe is super versatile and can be adjusted to feed any sized crowd.
You may need to make the dough in two separate batches, depending on the size of your stand mixer. But once the dough is formed, you can easily make all of the pretzels with cheese at the same time.
You can serve with an easy pretzel cheese dip, top with shredded cheese, make a homemade beer cheese dip or beer cheese sauce, or even make a cheese fondue. The options are endless!
Enjoy!
With love, from our simple kitchen to yours.
Don’t miss a thing! Follow us on
Facebook | Twitter | Pinterest | Instagram


Ooey Gooey Soft Pretzels With Cheese Center + Video
Equipment
Ingredients
- 2 1/4 teaspoons active dry yeast
- 1 1/4 cups warm water, 110°-120°
- 2 tablespoons granulated sugar
- 3 1/4 cups all-purpose flour
- 1 pound block mild cheddar cheese
- 1 teaspoon kosher salt
- 1/2 cup baking soda
- 1 large egg
- Coarse salt
Instructions
- Preheat oven to 450°F. Line a baking sheet with parchment paper or spray with cooking spray.
- Pour water into the bowl of a stand mixer (see cooks note if you do not have a stand mixer), sprinkle yeast over top, add sugar and stir. Allow yeast to bloom for 5-10 minutes. Once it is nice and foamy, it is ready.
- Meanwhile cut cheese into 36 even pieces, less than ½ ounce each. Fill an 8-quart pot with water and bring to a boil over medium-high heat. In a small bowl beat egg and 2 tablespoons water with a fork. Set aside. Sprinkle clean countertop with 1/4 cup flour.
- Add flour and salt to mixer. Knead for 3- 5 minutes until the dough comes together in one ball. Add more flour a tablespoon at a time as needed, if the bread is too sticky to come together. The dough should be tacky when you pull it out of the mixer, not sticky.
- Place dough on a floured countertop and knead in flour until it is no longer tacky, just a minute or two. Form dough into a ball. We are going to cut this ball into 36 (somewhat) even pieces. First, quarter the ball of dough. Roll each quarter into a fat log. Cut that into 3 pieces. Roll each piece into a log and cut it into 3 pieces. When you are done you will have 36 pieces.
- Roll each dough piece (one at a time) into a ball and then flatten it into a circle. Add a piece of cheese in the center. Carefully pull each side over the cheese to create a ‘cheese package’ then roll the dough into a ball. Be careful to make sure you can not see the cheese through the dough. Tap fingers in flour, pinch any tears and roll again. Set aside and repeat until all you have 36 stuffed dough balls.
- Carefully, a sprinkle at a time, add baking soda to boiling water. USE CAUTION: IT WILL BUBBLE UP. Place dough balls into boil water a few at a time. Remove with a slotted spoon after 30 seconds. Place on parchment paper to cool and repeat.
- Arrange all pretzel balls on parchment so they are not touching. Brush egg-wash onto each one and sprinkle with coarse salt.
- Bake for 8-10 minutes until the tops are browned.
- The ooey-gooey cheese may escape some of your pretzel bombs. That is a beautiful thing! Scoop all that cheesy goodness up onto the plate and serve. Your guests will go crazy over them.
- Enjoy!
Video
Donna’s Notes
Nutrition
All nutritional information is based on third party calculations and is only an estimate. Each recipe’s nutritional value will vary depending on the ingredients used, measuring methods, and portion sizes.

Originally published September 2013, updated and republished April 2025
Disclosure: Posts may contain affiliate links. If you purchase a product through an affiliate link your price will remain the same and The Slow Roasted Italian will automatically receive a small commission. Thank you for your support; it allows us to keep creating new recipes.


Welcome!
We’re Donna and Chad, the dream team behind The Slow Roasted Italian. Our focus is on taking complicated OUT of the kitchen. Life is busy enough, making meals should be fast and easy, to help make your life as simple as possible. Read More >>


These pretzels were a hit at our party! So easy to make and delicious.
Hi Harper!
We’re so glad you enjoyed.
TSRI Team Member,
Devlyn