

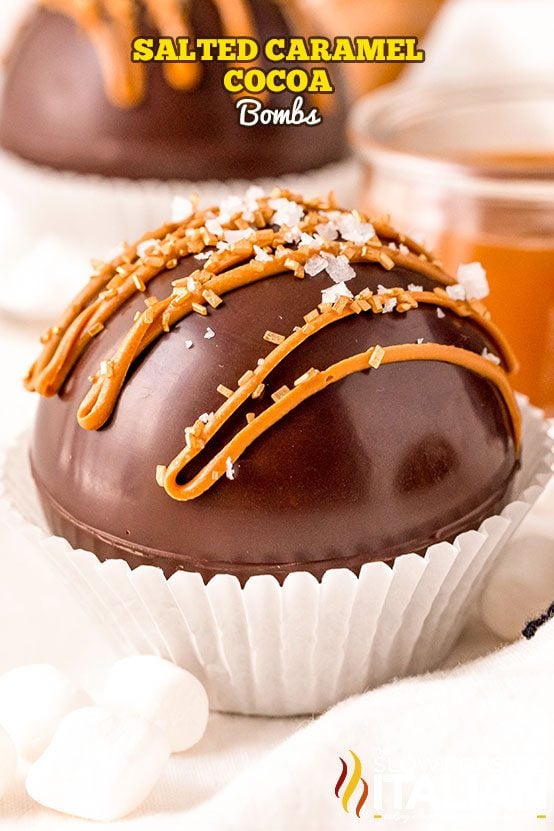
Salted Caramel Cocoa Bombs
Salted caramel cocoa bombs are bursting with marshmallows and flavored cocoa, then drizzled with melted caramel candies. Make a batch today!
Wrap these up as gifts or use them yourself as a fun way to enjoy a
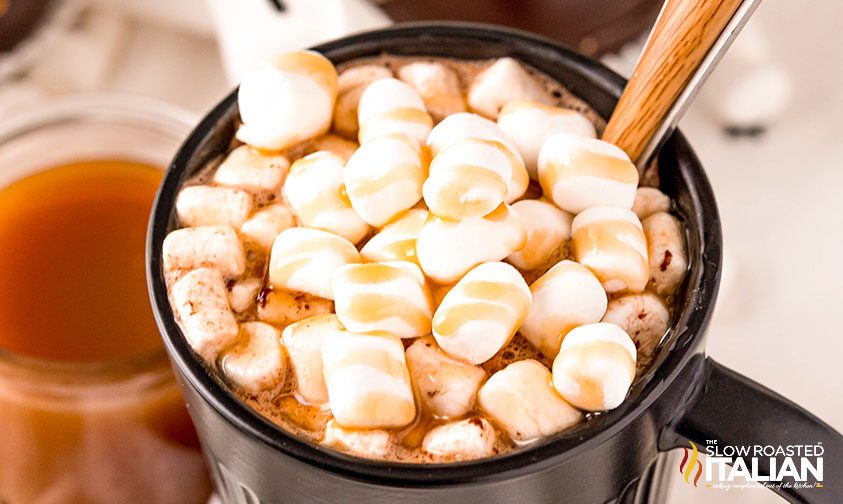
hot cup of tasty goodness! Just pop one in your mug and pour 8 ounces
of heated milk over the top.
As the outer shell melts, it will break open and release the salted
caramel hot chocolate mix to create a rich, velvety drink. Plus, the
marshmallows inside will pop up for a delicious topping.
If you want to make more of these hot drink desserts, we have other flavor variations like Fireball, mint, and raspberry.
Salted Caramel Cocoa Bombs – Tips and Tricks
- Use food prep gloves. These will help prevent fingerprints when handling the shells, but be careful not to touch a heated surface while wearing them.
- Tip for tempering chocolate: Smear a bit on a piece of parchment and chill for a few minutes. If it’s shiny and snaps easily, it’s ready. If it bends, then you’ll need to start over.
- How much cocoa mix? I found that 3 tablespoons of powdered mix works best for this recipe. That’s equivalent to a single 1-ounce packet, in case you don’t want to measure it out.
- Air dry mold in between batches. Silicone tends to attract lint, so avoid drying them with a dish towel. If needed, you can pat dry with a paper towel as well.
How To Make Chocolate Bombs
Get all of your ingredients and tools prepped and ready, then make your very own salted caramel cocoa bombs in a few simple steps!
- Add chocolate pieces to a microwave-safe bowl and heat until melted and smooth.
- Use the back of a spoon or small brush to coat the entire inside of the sphere mold in an even layer.
- Chill until the shells are fully hardened.
- Gently remove the shells, working slowly to prevent any cracks.
- Heat a plate in the microwave and melt the edges of one half on the surface.
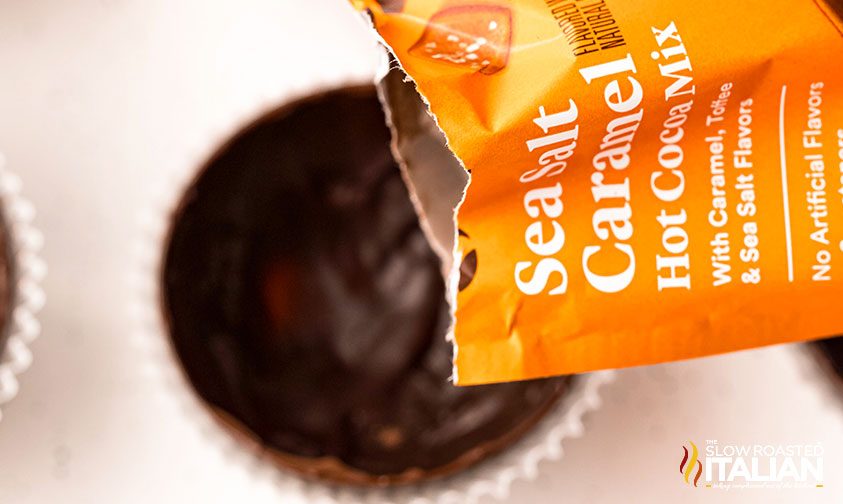
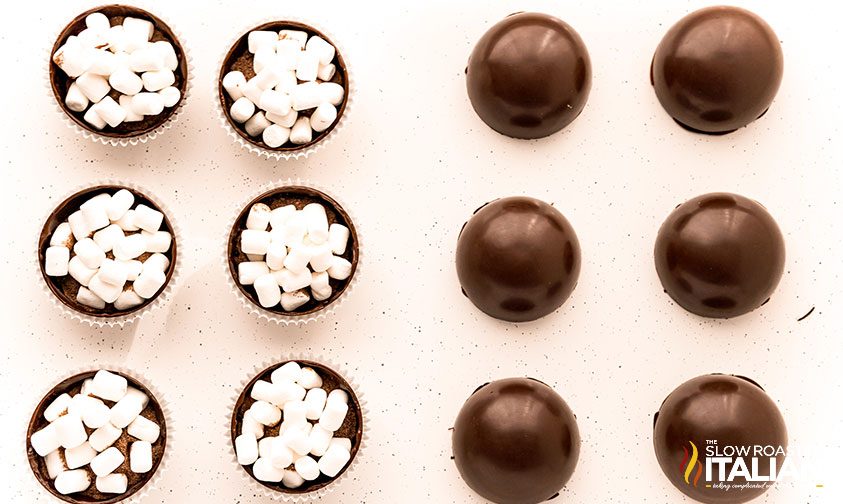
- Fill with salted caramel hot chocolate and marshmallows. You can cradle it in your hand or set it inside a cupcake liner for stability.
- Working quickly, melt the edge of another shell and press the two halves together.
- Repeat until all of them are formed, then chill again.
- Drizzle with melted caramels and add sprinkles or salt flakes as decoration.
Get Free Recipes Sent to Your Email
Do you ❤️ TSRI? Don’t miss another recipe!
Subscribe to The Slow Roasted Italian by email to receive new recipes in your inbox!!
FAQ – Common Recipe Questions
What kind of chocolate is best for cocoa bombs?
For best results, use a high-quality bar between 55% and 80% chocolate and with cocoa butter listed as one of the first ingredients.
Chips and wafers have additives that will impact the overall texture and flavor, and candy melts won’t work at all for this recipe.
Can I make these in advance?
While salted caramel cocoa bombs are best within 24 hours, they are safe for a month or two if individually wrapped or stored in an airtight container.
Enjoy!
With love from our simple kitchen to yours.
Don’t miss a thing! Follow us on Facebook | Twitter | Pinterest | Instagram ❤ ❤ ❤


Salted Caramel Cocoa Bombs
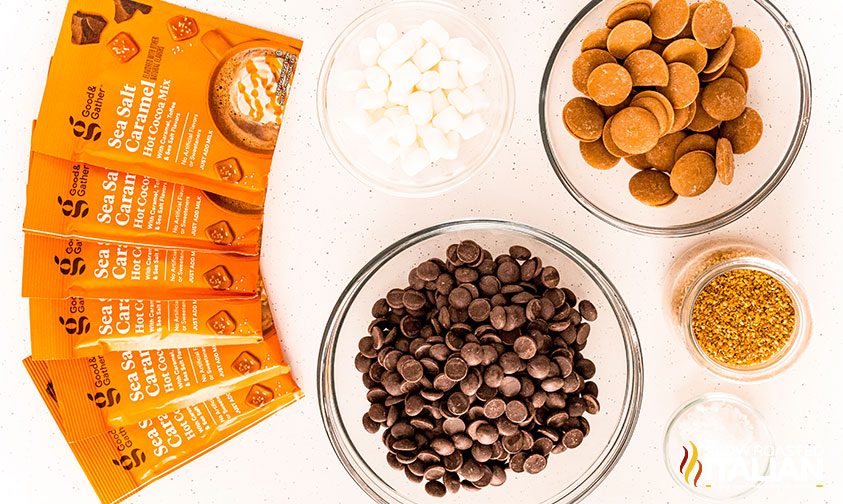
Ingredients
- 12 ounces couverture chocolate morsels or finely chopped high-quality chocolate such as Ghirardelli baking chocolate, divided
- 6 salted caramel hot chocolate mix packets, between .85 oz. and 1.25 oz. In size (I used these – Land O Lakes also has a large canister)
- mini marshmallows
- 3/4 cup caramel candy melts, optional
- flaky salt, optional
- sprinkles, optional
- 8 ounces whole milk, or milk of choice for serving
Instructions
- Add 5 ounces of chocolate to a medium bowl and microwave for 30 seconds, remove and stir, then continue to microwave at 15-second intervals, stirring fully and scraping the sides of the bowl with a rubber spatula between each one, until almost completely melted. Continue to stir so that the heat of the chocolate melts the unmelted pieces. Check the temperature to make sure that the chocolate reads between 88 and 90 degrees F. If it goes over 90 degrees, stir in an additional ounce of chocolate until melted to bring it back down to 88 to 90 degrees. If you are using two molds, you can do 10 ounces then add in 2 ounces, if needed. You don’t want that chocolate to sit too long and have to be reheated again if you only have one mold. If you do not temper the chocolate with a thermometer and this process, the chocolate can turn out chalky or discolored instead of shiny.
- Spoon about 1 tablespoon of melted chocolate into each mold and use the back of the spoon to spread it around, make sure to get all the way to the top of the rim and not leave any exposed areas. Place the mold on the small baking sheet and refrigerate for 5 minutes.
- Remove from the refrigerator and spoon another heaping spoonful into the molds one at a time (do not add chocolate to each cavity at once because it will start to cool too quickly and become thick, gritty, and hard to work with). Use the back of the spoon to work the second layer of chocolate around making sure to build up the edges around the rim, you want a thicker edge to ensure they don’t crack. Freeze for 10 minutes.
- Remove from the freezer and put on the food-safe gloves and remove the chocolate shells from the molds. Repeat steps 1 – 4 if using a single mold.
- Once all of your shells are made, microwave a flat plate in the microwave for 2 minutes, then place 6 of the 12 halves on the plate one at a time using a gloved hand to gently spin them to smooth the edges then place round side down in a regular sized cupcake liner on your work surface. Wipe the plate off.
- Fill the cavities with a packet of hot cocoa mix and marshmallows.
- Reheat the plate for 2 minutes in the microwave. Then repeat the process with the other 6 halves and place them on top of the cocoa filled halves and gently press to seal.
- Let the hot chocolate bombs set for a few minutes then melt the salted caramel candy melts in a microwave bowl at 30-second intervals until melted, then drizzle over the top of the bombs and add sprinkles and flaky salt if desired.
- To serve the hot chocolate bombs, heat the milk in a small saucepan over medium heat just until the edges begin to bubble the remove and pour over a hot chocolate bomb in a large mug and stir until fully mixed.
Donna’s Notes
Nutrition
All nutritional information is based on third party calculations and is only an estimate. Each recipe’s nutritional value will vary depending on the ingredients used, measuring methods, and portion sizes.

Originally published March 2021

Disclosure: Posts may contain affiliate links. If you purchase a product through an affiliate link your price will remain the same and The Slow Roasted Italian will automatically receive a small commission. Thank you for supporting us, it helps us keep creating new recipes.

Welcome!
We’re Donna and Chad, the dream team behind The Slow Roasted Italian. Our focus is on taking complicated OUT of the kitchen. Life is busy enough, making meals should be fast and easy, to help make your life as simple as possible. Read More >>


These came out so good, I definitely need to make more next time!