

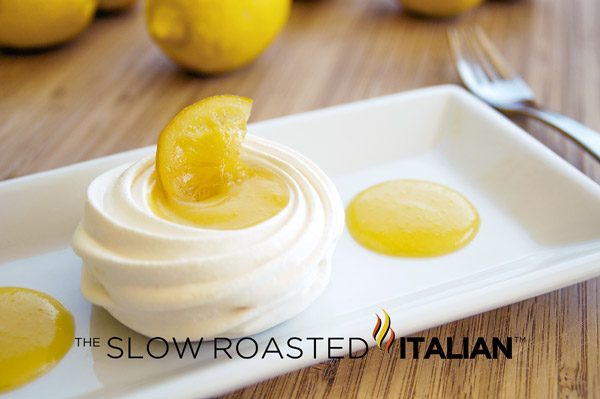
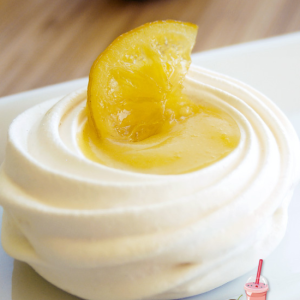
Lemon Curd Meringue Nests
This post may contain affiliate links. Please read my disclosure policy.

Lemon Curd Meringue Nests
Happy Friday Slow Roasters! I am so excited to finally be sharing this amazing treat with you. Although, I really have to thank the fantastic pin boards on Pinterest that I collect. Click here to follow us. I ran across this great post on a wedding blog that had a picture of a meringue nest filled with lemon curd. I thought to myself… Ding Ding! I have an out of this world Lemon Curd recipe and the perfect meringue cookie recipe. The meringue cookies bake up crispy on the outside and chewy on the inside. Oh, I can only imagine the two of them together.
I don’t think I was prepared for the rave reviews that the dessert received. I knew I loved it, but one of my chocolate loving friends declared this “So good, you could sell it”. That was pretty impressive coming from a chocolate lover. My good friend Mary has been threatening to come raid my stash of lemon curd and meringues.
I hope you enjoy these as much as we do. Chad and I adore these and have a bunch in the freezer (they keep pretty well). They are about a week old now and still taste amazing.
This is such a versatile recipe, I even made these super cute meringue ghosts for Halloween.
With love from our kitchen table to yours! XO
Lemon Curd Meringue Nests
Ingredients
- 3 large egg whites
- 1/4 teaspoon cream of tartar
- 3/4 cup superfine sugar, if you don’t have superfine sugar you can make your own by processing granulated sugar for about 60 seconds in a food processor
- 1/4 teaspoon pure vanilla extract
- 12 tablespoons 1/2 recipe The BEST Ever! Lemon Curd
- candied lemon slices, for garnish
Instructions
- Preheat oven to 200°F. Prepare a baking sheet by cutting a piece of parchment paper to fit. Turn parchment paper over and draw or trace 12 2″ circles (I used a 2″ circle cookie cutter and a sharpie). Turn paper back over (so marker is facing down) and set aside.
- Place egg whites In the bowl of your stand mixer. Allow them to come to room temperature (about 30 minutes). Using the whisk attachment, whip egg whites on low speed until foamy. Add cream of tartar and whip the egg whites on medium speed until they reach soft peaks.
- With the mixer on low speed, very slowly add sugar.
- Increase speed to medium-high and continue to beat until stiff peaks form. Add vanilla extract and mix.
- Transfer meringue to a piping bag fitted with a large tip (or a gallon zipper bag a small piece cut off the corner). I used a 1M tip to obtain the very nicely structured nests. You could also use an 1A for a smoother look.
- To form your nest, form the bottom by starting in the center of each circle and moving in a circular pattern, fill each circle with meringue.
- Using clean hands and water, lightly dip fore finger into water and gently press down the points where the piping ends.
- Following the edge of each bottom you have created, pipe the walls by piping 2 circles on top of each other (no need to stop once the first is complete, just continue piping and end when you have 2). You will end up with little points sticking up again, repeat the previous process and press down on each point with a damp finger to flatten it out.
- Place in oven and bake for 1 hour. Turn off oven and turn tray around. Allow tray to stay in oven for 1 hour, with the oven off. Meringues are done when you thump the bottom and it sounds hollow.
- Remove from oven and allow to cool completely.
- Spoon lemon curd into a clean piping bag (or plastic zipper bag with a tiny piece cut off the corner). Fill meringue nests with lemon curd. Allow to rest for 20 minutes and the lemon curd will seep into the meringue crevices. Refill nests again and garnish with candied lemon slice. Serve and enjoy!
Nutrition
All nutritional information is based on third party calculations and is only an estimate. Each recipe’s nutritional value will vary depending on the ingredients used, measuring methods, and portion sizes.

Disclosure: Posts may contain affiliate links. If you purchase a product through an affiliate link your price will remain the same and The Slow Roasted Italian will automatically receive a small commission. Thank you for supporting us, it helps us keep creating new recipes.

Welcome!
We’re Donna and Chad, the dream team behind The Slow Roasted Italian. Our focus is on taking complicated OUT of the kitchen. Life is busy enough, making meals should be fast and easy, to help make your life as simple as possible. Read More >>


It looks like a piece of art and i certainly agree with you on the diving into decadence part.
Love, love, love, love, love, love, love, love, love, love, LOVE these. Got it? Feel free to make them for me again anytime. 😉
love all with lemon curd, these look delicious:)
Beautiful! Absolutely a work of art. I will take some now too!
They are so beautiful.
I´m impressed to see how white they came out from the oven.
Beautiful
Marialuisa
Absolutely beautiful! I can practically taste that when I look at the picture!
These are stunning, Donna! A must try recipe~
Good idea to eat lemon curd! Thanks for sharing!
What beautiful pictures and an informative tutorial. I am a nut for anything lemon, so I'm going to try these.
200°are you sure?
Yes, that is correct.
Is the temperature in Celsius or Fahrenheit
That is F. Cooking these at a very low temp. Enjoy and let us know how it goes.
These came out perfect and I am no pro! I used the magic bullet to make my sugar finer and it worked very well. I will be investing in a piping kit because the ziploc bag method was super sticky and messy 🙂 This is going in my favorite recipes for sure!
These came out perfect and I am no pro! I used the magic bullet to refine the sugar and it worked very well. I will be investing in a piping kit though. This is going in my favorites!
how far in advance of serving can you fill the shells? and do you need to keep them in the fridge once they are filled?
Easy to make, didn’t last long maybe because I ate them all myself lol I will have to make them again so everyone else can have a taste.