

Best Homemade Bread Recipe
This post may contain affiliate links. Please read my disclosure policy.
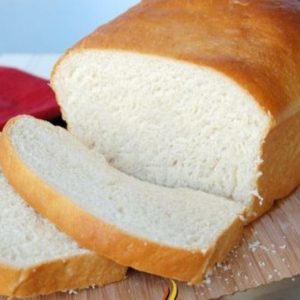
This is the best homemade bread recipe, EVER! A tender, slightly sweet honey and milk sandwich bread. Practically a no-fail recipe!

Have you ever had homemade bread? If you’re wondering how to make bread but not sure how to get started, this is the best bread recipe for you to start with. It’s incredibly easy and you won’t believe how delicious it is.
Homemade Bread Recipe
One of my favorite comfort foods is homemade bread. There is nothing that tastes quite as good as a warm piece of homemade bread topped with real butter. This simple white bread recipe is perfect for beginners and experienced bakers alike.
How do you make bread from scratch?
Every bread recipe is just a little bit different. But, if you’ve never made a homemade yeast bread recipe, there are a few simple steps that will be the same.
- Assemble the ingredients first.
- Then dissolve the yeast and allow it to proof.
- Add the remaining dry ingredients to the yeast mixture and stir.
- Knead the bread.
- Allow it to rise.
- Punch it down and allow it to rise again.
- Bake it.
Milk and Honey Bread Ingredients
While each homemade bread recipe is a little bit different, they generally include a combination of all purpose flour and bread flour, plus water, yeast, sweetener, butter, and salt.
The exact ingredients you use will depend on the type of bread you’re making and what flavors you want to stand out most.
What type of yeast should I use?
If you’ve ever purchased yeast before, you may have noticed that there are two different types available. You can buy Instant Yeast and you can buy Active Dry Yeast.
If you buy Instant Yeast, you can add it right to the dry ingredients while you make bread. There’s no need to dissolve it first.
But, if you purchase Active Dry Yeast, you will need to dissolve it in warm water first. Instant is easier. But, you can use either.
What you will need for making white bread
- Stand mixer
- Bread pans
- Large mixing bowl
Homemade Bread Recipe FAQ
What bread pan makes the best bread recipe?
When it comes to making homemade bread, you can use aluminized steel, glass, or ceramic pans. While they will all work, I have found that aluminized steel and ceramic conduct heat the best.
Using a glass bread pan can result in bread that sinks more often than rising. When choosing the type of aluminized steel for your yeast bread recipes, I look for a lighter color pan because it cooks more evenly and doesn’t burn as often.
How can I tell when bread is done baking?
The easiest way to tell if your white bread is baked through is with a food thermometer. When it’s done baking, your bread should be between 190° and 200° F.
You can also judge by the color. For this bread recipe, the loaf will have a light golden top when it’s done. Or, you can use the method I use, which is to remove the bread from the pan and turn it over.
Knock gently on the side of the loaf. If it sounds hollow, it is probably finished baking. If not, put it back in the oven for a few more minutes. For this recipe, it usually takes 30 to 40 minutes.
Get Free Recipes Sent to Your Email
Do you ❤️ TSRI? Don’t miss another recipe!
Subscribe to The Slow Roasted Italian by email to receive new recipes in your inbox!!
How to store homemade bread
When it comes to storing your bread, it’s important that you keep it in an airtight container. You can purchase bread bags and tie them with a clip.
Or, they make plastic containers made specifically for homemade bread.
If you don’t store your bread properly, it will go stale and become hard.
If you don’t think you’ll eat it quickly enough, you can slice your bread and then freeze individual slices in freezer bags.
When you decide you want a slice or two, just remove them from the freezer and let them thaw in the refrigerator. To warm them up, just put them in the toaster and enjoy.
Serving Suggestions
A slice of homemade bread goes wonderfully with almost any dinner entrée. Consider serving it with my Spaghetti Carbonara or my Slow Cooker Minestrone Soup.
Of course, it’s also good for breakfast with my Spiced Peach Jam on top.
OTHER BREAD RECIPES
If you love making bread, you might want to try my 4-Ingredient Amish White Bread, or my cinnamon swirl bread recipe!
Best Homemade Bread Recipe
Equipment
Ingredients
- 2 1/2 cups warm milk, 110° to 120°
- 1/2 cup honey
- 1 1/2 tablespoons active dry yeast, 2 packets
- 8 tablespoons unsalted butter, 1/2 cup, melted (divided)
- 1 tablespoon kosher salt
- 7 cups all-purpose flour
Instructions
- In the bowl of a stand mixer add milk and honey. Sprinkle the yeast over the top and swirl with spoon or fingers to combine. Allow the yeast to sit for about 5-10 minutes while it blooms and becomes aromatic.
- Add melted butter and 4 cups flour. Mix on low, using the dough hook, until smooth. Add enough remaining flour to form a soft dough (mine takes the whole 3 additional cups) add salt.
- Turn the mixer to medium and knead for 5 minutes. When it is ready, your ball of dough should be tacky, not sticky. When you touch the dough and pull your fingers away the dough should not stick to your fingers. If it is sticky, add a little more flour 1 tablespoon at a time until it becomes tacky.
- Turn the dough onto a floured board; knead about 10 turns. Scrape any extra dough out of the bowl. To knead the dough: fold it in half, gently press the dough away from you with the heel of your hand and then turn the dough. Repeat. When you are finished kneading your dough should be smooth and elastic.
- Shape dough into a smooth ball so it will rise properly: fold the sides of the dough over into the middle of the dough. Flip the dough over. Cup your hands along the right and left sides of the dough and pull it toward you. Rotate the dough a quarter turn and repeat. After about 10 times you will have a nice smooth dough.
- Place 1 tablespoon of melted butter in your cleaned stand mixer bowl. Place the dough into the bowl with the butter, flipping once to grease the top. Make sure the smooth side of the ball is on top for the rise. Cover with a clean towel and let the loaf rise in a warm place until doubled in size, about 1 hour.
- Punch dough down and divide into two.
- Shape the bread for the bread pans: Place dough on a lightly floured countertop. Pat one of the divided doughs into an oval. Fold the top third of the dough and fold it into the middle of the dough. Use the heel of your hand to press the top layer into the bottom layer. Repeat with the bottom third of the dough. Like you are folding a letter. Fold the dough in half. Pull the ends of the dough down and tuck under like a package to make a smooth dough.
- Place each dough in a greased 9-in. x 5-in loaf pan. Press the dough down flat in the bread pan, using your flat hand to help it rise evenly.
- Preheat oven to 350°F.
- Cover and let rise in a warm place until doubled, about 45-60 minutes.
- Place bread on the center rack. Bake for 30-35 minutes or until golden brown. You can turn in out onto a plate and thump the bottom of the bread if it sounds hollow it is done.
- Allow the bread to cool in the bread pan, on a wire rack for 5 minutes.
- Remove the bread from the pans and brush with the remaining butter.
- Let the bread cool for at least 30 minutes before cutting or you may smoosh the bread loaf. I can never wait, but it is best if you can.
DINNER ROLLS INSTRUCTIONS
- Shape dough for dinner rolls: Divide dough into 12 pieces and form into balls by flipping the dough over and folding the edges in the middle. Flip the dough over onto an unfloured countertop. Cup your hand over the dough and roll it over the board until rounded.
- Then place the dough balls, pinched side down in a greased 9″x13″ baking pan. Cover with a clean towel and let the loaf rise in a warm place until doubled in size, about 1 hour.
- Preheat oven to 350°F.
- Bake for 15-17 minutes or until golden brown. If the tops begin to brown too quickly, lightly tent the rolls with aluminum foil for the remainder of the cook time. Remove from oven and brush tops with 1 tablespoon remaining melted butter. Serve and enjoy!
Donna’s Notes
Nutrition
All nutritional information is based on third party calculations and is only an estimate. Each recipe’s nutritional value will vary depending on the ingredients used, measuring methods, and portion sizes.
Originally published July 2011.

Disclosure: Posts may contain affiliate links. If you purchase a product through an affiliate link your price will remain the same and The Slow Roasted Italian will automatically receive a small commission. Thank you for your support; it allows us to keep creating new recipes.

Welcome!
We’re Donna and Chad, the dream team behind The Slow Roasted Italian. Our focus is on taking complicated OUT of the kitchen. Life is busy enough, making meals should be fast and easy, to help make your life as simple as possible. Read More >>


I made this and it came out PERFECT! Changed nothing and this was the 1st time I made bread without a bread maker. Everyone even my picky husband loved it
I'm getting ready to try this recipe and plan to make cinnamon swirl bread with the second loaf. I can't wait to see how it turns out!
I just took this bread out of the oven. It smells so good. The dough was really easy to work with. I really like trying your recipes. They are consistently great. 🙂
I am so happy to hear that Stephanie! Thanks for trusting us. Enjoy and keep us up on date on your kitchen adventures! XO
i am going to attempt to use a cup4cup GF flour blend and try making this gluten free. will let you know if it turns out 🙂
Just made bread for the first time using this recipe! 🙂 Had to look up videos for how to knead and pinch to fit in pan, but it turned out great! Thank you!
Hi there!
I live in Denver…the mile high city…and was wondering if I need to make any adjustments for high altitude??
This is one of the only bread recipes I have tried that is consistently great every time i have tried it. Just made it again for the 3rd time! It is true yum food. 🙂
I am so happy to hear that Kitchen Novice. My family loves this recipe. I even adapted it to me a gluten-free version that I hope to share soon.
This is my go to bread recipe, makes great buns too. I make it dairy free using unsweetened almond milk and earth balance soy free spread. It needs a bit more flour than the original recipe but it turns out great. Making it into buns right now for burgers tonight. Cannot wait to taste test!
I tried this recipe for the first time today and it came out great my family loves it. I can wait to make this again
I've made this multiple times and it's "me"-proof! I hit the recipe in half and still great .Now I'm trying different seasonings and it's so much fun. Rosemary anyone?
My husband and I love to bake for fun, and we both ended up loving this bread recipe! This is one we are going to have to keep and make again!